Anyways .. back to the tutorial...
Since it is the holiday season, I thought a gift wrapping theme would be appropriate. By no means am I insinuating that you don't know how to wrap a gift .. I just thought it would be fun to show you how I do it.
Step One: Go ahead and gather all the materials you will need so you have them at arms reach. The items I used are: Gift, wrapping paper, tape, scissors, ribbon, paper and markers.
 |
| paper and markers not pictured. oops. |
Step Two: Unroll your wrapping paper and, using your gift as a guide, cut out a generous piece of paper that easily wraps around all sides of the gift.
 | |
| I like to pick the smallest sides as the "ends" which will be where you fold everything. |
Step Three: Fold one side up and place it in the middle of the top. I like to place a tiny piece of tape here just to keep everything snug.
Step Four: Bring the other side of the paper up to meet in the middle. Fold the paper edge over so the seam looks clean and neat.
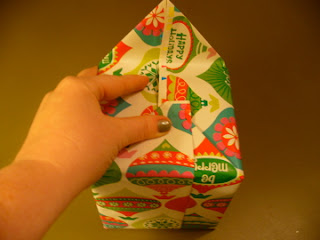
Step Five: Find the two opposite sides that don't contain the main seam. Push one side down and neatly crease all the edges. Do the same for the other side. *Note: I went ahead and did one side so I could show pictures on the table top. Placing the gift between your knees will allow you better handling when doing the first side.
Step Six: Take the flap that contains the seam and fold it up towards the middle. Take the top flap, and after folding down the tip to make it neat, fold it over the lower flap. Place a piece of tape on top to secure it in position.
Step Seven: Depending on your choice of "finishing touches" the following steps will vary. I did a simple ribbon in order to demonstrate a square knot. *Note: After starting I realized I didn't have enough spare ribbon. Normally I would have done a bow but I just didn't have enough to allow for that. Sorry.
The basics of a square knot are this: whatever side you overlap first, overlap the other end next. (i.e. left over right then right over left). This allows the knot to pull on itself and it won't untie. It will also never get too tight where you can't untie it.
 |
| left over right |
 |
| a more complete "left over right" |
 |
| right over left |
Step Eight: I like to use real ribbon. It makes the whole gift presentation look a little nicer. You can find nice ribbon on sale almost anywhere. Just try not to use busy paper and busy ribbon. If you use real ribbon then this would be the time to tie a bow. You can use any bow you like. If you use gift curling ribbon then this would be the time to take your scissors and curl it. You get the point. Since I ran out of ribbon then I won't worry about showing you a picture of the bare knot. :)
Step Nine: Identifying who the gift belongs to. This is another outlet for you to be creative. If you have kids then this would be a great project for them to do. You can buy a ton of different tags in the store but if you want to make it look more personal then you can certainly make your own. I spent only a couple minutes throwing this one together (and it looks like it ..haha) but you get the idea. I simply cut out a shape similar to those on the package and colored it accordingly. Use your imagination and have fun!
Merry Gift Wrapping!


No comments:
Post a Comment