Showing posts with label Organized Chaos. Show all posts

11.19.2012

Don't peak! Ok, maybe a little...

The past month or so has been nothing but work, eat and sleep.  Nothing too exciting has really been going on ..  until now!  There have been a few house DIY/renovations on the back burner for a while but not anymore. 

Here's a sneak peak at posts you can (hopefully) expect sooner than later:


And for those of you that I know in real life and insist that my house is always clean.. the photo below is proof that this is not the case.  Hooray for construction :)


2.03.2012

Weekend Outlook: The Single Girl Edition


 Normally I write a post with a specific topic in mind.  I don't feel like it today.  I guess if I have to label it then we will go with "weekend".

Mark left this morning for a guys' weekend in the mountains.  He really deserves the mini-vacation so I am happy for him.  That means, however, that I will be single until Sunday. 

Mark is definitely not one to get in the way when I am trying to clean or organize or anything but yet I always get excited when this weekend rolls around annually.  I get the chance to not cook full meals, organize/clean at whim, and read hours on end.  It's my own little retreat, too.

I set out yesterday making my to-do list for the weekend; a list of all the things I wanted to accomplish on my own timetable and without distraction.  Unfortunately, everything might not get done as I planned (surprise. surprise.) because I woke up this morning with a cold.  Right now I am just looking forward to quickly swinging by Target for a couple things and then going home to bed.  NOT how I planned to start my weekend.  I am kind of bummed about it because I haven't been sick since April.  I was hoping to go a full year but no cigar. Maybe I will get a second wind when I get home.

Nevertheless, I have a to-do list and I am sticking to do.  I may not complete the whole thing but at least some is better than none.  In the spirit of organizing my thoughts and making myself accountable to my goals, here is my to do list as it stands now:

~ Read 1 book (maybe 2)
~ Detail inside of my car
~ Start (complete?) taxes online
Deodorize/clean carpet
~ Finish organizing and decorating the guest suite and "lounge"* from the room swap a couple weeks ago
~ Come up with an appetizer for the Super Bowl party (and then attend said party)
~ Laundry
~ Come up with menu/grocery list for the week
~ Clean the house (dust, bathrooms, etc.)
~ Go to a birthday party for a little friend that is turning 1 (this depends on the sick status .. no need to spread germs!)
~ Go to Target for items to complete tasks above.

I think that is about it.  There are ton of little individual tasks on my written list in front of me but they all generally fall under the categories above.  Honestly, the list is totally doable.  It's actually pretty doable with a cold (minus the birthday party) but you never know.  I may wake up tomorrow healed or I may wake up feeling dead.  We'll see. 

The point of all this is that I plan on having a productive, happy weekend.  I wish the same for all of you. Whether you are hammering out a to-do list like me or just want to sit on the couch for 48 hours...  I hope it's everything you want it to be.  I will report back and let you know how I did.  Happy Weekend!

* Ever since the man room moved downstairs it has kind of lost it's exclusivity.  It's not longer separated from the main living space and so "man room" or "man cave" just doesn't feel appropriate.  Right now it holds two lounge chairs, a bookcase and a small beer fridge.  (It used to have a couch, TV, etc but those were repurposed for other rooms)  Since its main purpose right now is reading or listening to music, we jokingly deemed it "The Lounge" .... and it kind of stuck.  It's embarrassing but we really just don't know what to call it.  So with my tongue firmly planted in my cheek .. I will now be referring to the former office as "The Lounge".

1.26.2012

The 10-Minute Quick Clean

Have you ever invited someone over to your house and it wasn't until you hung up the phone that you realized your house is a wreck!?  It happens to the best of us.  Here is my list of things that I do in this exact situation.  Got 10 minutes? Ready, Set, Go!

My focus is primarily on three places:  living room, kitchen and guest bathroom.  When friends/family drop by, these are the three rooms they would most likely frequent. 


Living Room:
  • Check to make sure couch cushions are straightened and pillows are placed where they should be.
  • Fold any blankets and put away. (I have a storage ottoman I throw them into.)
  • Gather magazines, books, etc and either place them in a neat stack or take them to another room.
  • Take all cups/dishes/shoes/jackets/etc to the rooms they belong in.  (If the rooms have doors, i.e. the bedroom, just throw the items on the bed and shut the door.)
Do you have a few extra minutes?  Run a dustcloth over sidetables and coffeetable.  You can also do a quick vacuum of the high-traffic areas.


Kitchen:
  • Are there dirty dishes on the counter/in the sink?  Quickly load the dishwasher.  If the dishwasher is full, and it would take too much time to unload/reload, then just rinse all the dishes off to remove the food residue and stack neatly in the sink. 
  • Wipe counters down to remove crumbs and smudges.
  • Clear the kitchen table or stack everything neatly.
Do you have a few extra minutes? A clean sink really makes a world of difference so do this task if you can.  You can also do a quick sweep/vacuum of the floor to remove crumbs and dirt.


Guest Bathroom:
  • Check toilet and maybe do a quick swipe with the brush if necessary.  Don't worry about cleaner.  You can sanitize later.
  • Wipe down counter surfaces and mirror.
  • Straighten towels and floor mats.
Do you have a few extra minutes?  Empty the trashcan and light a candle!


Don't be afraid to ask family members to help!  Even kids can get in on it.  They can certainly take shoes to closets or stack magazines.  Also note that most of the 'dirt' in your home only you can see.  You know what it looks like at its cleanest so that is what you are judging against.  No one is going to care at the end of the day if there was a spare sock you missed or a bowl in the sink.  You live in your house.  It's not a museum.  Relax and enjoy your company.

1.16.2012

Office Swap

This past weekend set my makeover-loving heart aflutter when we switched several rooms in our home.  Below is the new office.  It is one of the most-loved and frequently used rooms in our house.  The new set-up makes me a bit gitty.

The first three photos are panoramic "before" shots.  I wanted to give you somewhat of a sense of how the room was laid out.  Please also note that I never got around to decorating this room.  I decorated it with a bunch of cast-off accessories and hand me downs mixed in with some "on purpose" pieces.  Since this is a free makeover though, you will be seeing most of this again (but upstairs).

Can you spot Merlin's photo bomb?  He was keeping an eye on me and that pesky camera.

This camera setting makes the room look pretty small.  Those windows are actually really big.

Once again .. the scene is skewed.  That's a queen bed and a 5-foot dresser.

The following shots are just to more clearly see the things in the room.

Not a single piece of bedding matches. haha. Yay for guest room doors that you can close ;)

That dresser was a hand-me-down to fill the space.  It's not our style (and no longer necessary) so it has since been donated to a local thrift store.  C'est la vie.

This is a gallery wall Mark made.  The theme is "Welcome to Our Home".  It is a series of macro shots of our house.  I.LOVE.IT.  It will be relocated.


And now for the afters.  Like I said, all this stuff we had within the three rooms.  This room is not even close to being done.  I just set everything up to make it functional.  This now serves as the office/future kids playroom/second den.  These pictures will soon become the "befores".

This was the wall with the bed.

Sorry for the bad lighting.  I didn't want to wait until night to shoot so we will just have to deal with the blue tinge.
Once again .. daylight + me refusing to learn how to properly use the camera settings = bad picture quality.

This couch is another hand-me-down from the grandmother.  It's super comfortable but covered in pink flowers.  I don't think the ratty red slipcover will stay but it works for now.

R.O.Y.G.B.I.V anyone?  I heart me some color-coding.

That little TV has been around for years.  It works great and always fits in the tiniest spaces which I love.  The black shelves are actually the two nightstands from the old room.  Mark made them and they were hung on the wall.  When I was rearranging I realized the TV fit perfectly inside one of them.  Insta-mini-entertainment-center :)

Merlin .. the couch opportunist. <3

The Great Switcheroo

I love me a makeover. Nothing beats a good "before and after" and I bet you would agree with me. There is just something about drastic change that gets me excited.

Mark and I constantly toss around ideas of what we want to do with our house. We had never formally written the list down so I attempted to do so recently. It's only been in black-and-white for a week and yet items have been finished, added and removed. I will get to the completed items in a second but here is the newly amended list:

Build a shed
Landscape with mulch and a tree or two
Install a pantry
Install double sinks in the master bath
Frame the mirror in the master bath
Replace the mirror in the hall bath
Add a fan in the kitchen
Move the office into "bedroom 3"
Move the guest room upstairs to make a "guest suite"
Move the 'man room' to "bedroom 2"
Create a second closet in new office
Build better closet organization in office and "future nursery"
Install a back splash in the kitchen
Build outdoor planter boxes/benches to line the patio


As I am sure you can tell, the new/tweaked items are in blue. There are a couple items missing  that had to do with opening up a wall in the living room (and subsequently adjusting our hardwoods). We went up in the attic on Saturday and realized that the wall is very much load-bearing. We know we could add a header and fix the opening structurally but it's just not worth it. We may add it back to the list later but, as of right now, our monies and time are better spent elsewhere. The ones dealing with the mirrors and fan were on the list 'in our head' and I simply forgot to add them. I didn't realize it until after the list was published.

The Great Switcheroo actually began on Thursday night. (Leave it to me to start a huge project on a work night .. poor Mark.) The original plan was to simply flip the old office and guest room. They are right across the hall from each other so I figured it would be easy. I should have known better.

We spent Thursday night swapping all the furniture and I quickly realized that making the old office the new guest room was just not going to work. The furniture was just too big and the room felt cramped. I had to rethink the situation. On Friday night, while organizing the new office, I contemplated how to remedy the guest room conundrum.

Upstairs we have a bedroom, full bath and walk-in closet.  When we moved in, since the room is separated from the main part of the house, we deemed this the "man room".  Over the years it has become a catch-all for Mark's various projects and not the 'getaway' originally planned.  When thinking about the guest room situation, it dawned on me that upstairs would make a fantastic "guest suite" because guests would have complete privacy and quiet.

I wanted to be fair to Mark and so I approached the subject carefully.  Once I explained my idea to him he agreed.  So on Saturday, the guest room furniture moved upstairs and the beer fridge and lounge chair moved downstairs.  By Saturday night we were exhausted and thrilled.  I just can't get over the changes.  I feel like we have doubled our square footage and the flow is so much better.  I just wish we had done this four years ago.

All of the rooms are in various stages of progress and it will be a long time until they are totally finished.  I will post "before and after" pictures based on the original switch.  We spent $10 on sheer window panels for the new office and that was it.  So for $10 we got three brand new rooms.  Not too shabby :)

Each room will get its own post (the better for referencing) so keep an eye out.  First up is the new office....

Have you done any room switching lately?  Do you start projects on weeknights knowing you have to get up early in the morning?  Do you love makeovers as much as I do?

1.04.2012

Cataloging Christmas Cards


I LOVE getting photo cards during the Christmas season.  I prop them around and they put a huge smile on my face.  What I don't love is having to deal with a ton of differently-sized loose photos after the season is over. 

I am not one for keeping cards.  I like them and all but I guess I am just not that sentimental.  For instance, if you send Mark or I birthday cards, they are displayed for the month of the birthday and then they are tossed.  Sorry.

Christmas cards are the exception.  More thought is behind them and it's great seeing families evolve over the years, especially the ones with kids.  It's a great way to share a little bit of your family with the ones you may not get to see all that often.

With that being said, my goal was to come up with a way that pleased by OCD side (i.e. I can't handle clutter and must throw everything away) while appeasing my ever-so-slight sentimental side (i.e. how fun would it be to look back and see how everyone has changed?) 

My solution?  I make a photo album.

If you like the idea, there are several ways you can go about doing it.  The old school (and just as nice) way is to buy a blank album, get colorful paper and creative scissors and glue the photos to the page.  Those albums are great but, personally, I don't have the attention span.  I also don't have all the materials so it would be a hassle for me to go out a purchase them.

What I do have is a computer and scanner.  I use Shutterfly and iPhoto but there are a ton of different programs out there.  Basically I take everyone's card, scan them into the computer and assemble a photo book online.  Each year, for about $15 and a little bit of my time, I can make a keepsake of everyone's card and have them neatly in one place.  I also like the photobook idea because they keep longer and they become seasonal coffeetable books.  They are a good time had by all.


Please note that, in my experience, I have had to use Photoshop in a few instances due to how certain cards scan.  This may vary on your scanner and cards but because the photos need to be very high quality, you need to double check each one before assembling your book to ensure they aren't grainy.


Do you keep your photo cards?  Do you have a way of storing them?  Do you make photo books for other occasions, like documenting vacations?

12.23.2011

The Art of Hospital Corners

Ever heard the saying "it's the little things in life"? Well that is very true for me. Getting all greens on the way to work, making the perfect cup of coffee, 70-degree blue skies, etc. I get a lot of joy out of the details. One of the things I love is a freshly made bed. I always sleep so much better when the sheets are perfect.

Although that previous paragraph is entirely true and sounds extra Martha Stewart-ish .. please don't get me wrong. I never get all greens. I tend to drink slightly-less-than-perfect coffee. I'm always stuck in my cubicle on those 70-degree days. And my bed?

I'm going to be really honest with you:  I have always been taught you should wash your sheets once a week. Yeah, this doesn't happen. I'm lucky I get all of our laundry done and put away once a week .. and there is only two of us! I just DO NOT like laundry. I will wash it all day long but I hate putting it away. So seeing as clothes are far more important than sheets, I always save the sheets for last.  If I have the energy and that time .. they get washed.  If I don't .. they don't.  With that being said .. I average 1-2 times per month.  I'm sorry if that grosses some of you out.  We shower regularly and work desk jobs.  I just don't feel like it's all that bad.

Seeing as how I just admitted to you how non-Martha-ish I am, I'm going to let you in on one of my little secrets.  Sometimes if you just take the extra time to do something really well and thoroughly .. the results last a lot longer and you have to do it less often.  I will gladly spend an extra 3-5 minutes on the following task if it gives me an extra week or two of laziness.  The task I am referring to is making the bed.

The trigger for "omg I need to change these sheets NOW" is when they just start to get all rumpled and out of sorts.  I "make the bed" every day but straightening the sheets is far different from remaking it from scratch (which you obviously only do when you replace the linens.)  I've learned that if I do really well the first time then the non-rumpled feeling lasts longer.  So if you are even slightly like me and want to know how to keep a bed fresh-feeling longer.  Here's is a how-to guide on the art of hospital corners:


1. Spread the flat sheet out on the mattress that already has the fitted sheet on the bottom and center it. Place the top end of the sheet about 1 inch from the edge of the mattress at the head of the bed.

2. At the foot of the bed, lift the mattress and pull the top sheet snugly under the mattress. Do this at both sides of the bed so that the top sheet is firmly tucked under the mattress.

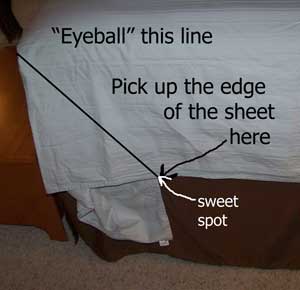
3. "Eyeball" a line from the corner of the mattress to the side edge of the sheet that is hanging down. This imaginary line should be at about a 45 degree angle.


4. . Using this imaginary line pick up the edge of the sheet at the "sweet spot". This will be the only spot where you pick up the sheet from now on.


5. Fold the sheet back over the mattress. It helps if you put your free hand on the edge of the mattress and fold the sheet over it.


6. Tuck in the sheet on the side of the bed that is hanging below the mattress. It should look like a little triangle and that is what gets tucked under the mattress.


7. Pick up the edge of the sheet again, right on the "sweet spot". Put your free hand on the side of the mattress this time. Bring the sheet down over your hand.


8. And there you go!  A perfectly made bed that will hopefully buy you some extra laziness.  Just throw your duvet or comforter on top and you're done.  Once you do this a time or two it honestly doesn't take long at all; an extra 3-5 minutes max.


Do you make your bed this way?  Do you wash your sheets weekly? More? Less?  Am I totally gross because I only change them once or twice a month? (Don't answer that last one ;) )

12.19.2011

Christmas Cards Galore


I didn't grow up in a family that did annual newsletters or picture cards.  It just wasn't our thing.  I'm sure, at some point, my mom did this but not that I can remember.  I always loved getting them though so I knew when I was out on my own I would make a point to start the tradition.

The first year, 2008, ended up being a rush job.  I wasn't sure how to go about doing them and where the best places to get them.  I can't remember where we ended up buying them from but I learned a hard lesson that year:  photo quality matters!  The pictures ended up blurry but the point was made.  Lesson learned.

In 2009 we tried our hand at making them from scratch.  No template, no anything.  It actually turned out pretty well.  We didn't learn any hard lessons except when you design them yourself and then get them printed .. envelopes aren't included. Oops :)

The 2010 season brought us back to pre-made template designs.  No complaints from this girl.  I still like those cards.  We designed them online, submitted them and picked them up at the local store within 30 minutes.  It was efficient and great.

This year, once again, we tried something new.  We went with Shutterfly.  The price ended up double what we paid in years past so that gave me some pause.  (I'm sure there are more affordable options and I will be sure to check them out next year.)  I love this year's card.  The paper quality is fantastic and I love the printing on both sides.  One side (the side pictured) is matte finish and the other side is glossy. Love. It.

Who knows what next year's card will look like (and where it will originate from, for that matter) but, in the mean time,

Merry Christmas and Happy New Year
from our family to yours!


2011


.. from years past ..
(side note:  these cards have been stuffed in folders so I apologize for the poor quality.  They were scanned in .. wear and tear and all.)


2010

2009

2008

12.15.2011

Getting Cozi

Thanks to my friend Allie, I have been introduced to my new favorite organizational tool.  Cozi!

The Cozi Family Organizer is awesome.  You can sign up for it free online at www.cozi.com.  It's great for all kinds of uses.  I honestly haven't had it long enough to really play with it but so far it has done two things that have, for me, given it enough street cred to last a while.

(Side note: The other important factor with this program is the free downloadable app.  By having it online and in app form it is the best of both worlds.)

One of the features I am loving is the calendar.  You can upload and sync all of your calendars so that you have them in one easy to read location.  You can color-code each family member so you can see at-a-glance when someone has something.  There is one email address/password for each account so you can have all of your family members download the app, login using the family address/password, and then everyone can see the same information.

The other great feature is the grocery list.  I typically write down everything I need on my grocery trip on paper and then mark the items off as I place them in my basket.  With this app it's so much easier.  You can quickly type up your list online and it will be on your phone when you get there. You can, of course, add items via the app but typing them on the computer (given the access) is easier/faster for me.  As you go through the store gathering items you can check them off the list.  The "checked off" feature is great because it mimickes that of a paper list by turning the font light grey and striking through the item.  The program will also save your list if you want so if you tend to buy the same things over and over again then you won't have to keep writing them down.

There is so much more to the site but these were the top things that, so far, I have found most helpful.  There is an entire section dedicated to tricks and tips for getting organized and such so I am sure I will find some gems in there as well.  Anyways, the holiday season can be hectic so here is a tool that I hope you might find helpful.

Do you know of other programs like this one that you like?  Do you use apps like this or do you prefer to have a hardcopy daytimer?

12.13.2011

The Art of Tying a Perfect Bow

Knowing how to tie a perfect bow can come in handy sometimes. Whether you are wrapping a gift, making a craft, tying a dress or putting a ribbon in your child's hair .. there are many ways to show off your newly learned skill. Below are three bows that I learned to tie via Ms. Stewart:

The Favorite Bow
Perfectly suited for wire-edge or stiff ribbons that hold their shape. You'll need at least twelve inches of ribbon just for the bow. If wrapping a box, first tie a left-over-right half-knot.

Bow How-To:1. Shape two evenly sized loops, one in each side of the ribbon.
2. Cross right loop over left one.
3. Knot loops by threading right loop behind left one, under, and up through the hole; make sure ribbon is not twisted or bunched.
4. Pull loops into a smooth knot. Adjust loops; trim tails to be slightly longer than loops.


The Double Bow

To make a perfect double bow, leave enough tail on both ends of the first bow to make the second one. An extra set of hands is also helpful to ensure that loops are taut. First, follow directions for the favorite bow, leaving an even tail on both sides; don't finish ends.

Bow How-To:

1. Position bow horizontally, and determine which tail exits the knot on the top, and which exits underneath. Make a loop in each tail.
2. Cross top loop over bottom one.
3. Knot by threading top loop behind bottom one, under, and up through the hole; make sure ribbon is not twisted or bunched.
4. Pull loops to tighten; make sure knot of second bow overlaps knot of first. Trim tails, and arrange loops.


The Winged Bow
This classic treatment is simple and not frilly.  You'll need twelve to fourteen inches of ribbon to work with after encircling the object; use a right-over-left half-knot to secure the object.

Bow How-To:

1. Cross left tail over right one.
2. Knot ribbon by threading left tail behind right one, under, and up through the hole; make sure ribbon is not twisted or bunched.
3. Pull evenly on tails until ribbon has tightened into a clean, smooth knot.
4. Arrange folds, and trim ends of ribbon.


Happy Bow Making!

12.09.2011

The Art of Wrapping a Gift

This officially marks the second new "series" of posts that I have started this month.  The first new addition was my midweek confessions series; a weekly confessional where I divulge my imperfectness.  This second series I will call my The Art Of series; a photo tutorial on things that can make your life easier and more organized.  Sometimes it's simply in the minutiae.

Anyways .. back to the tutorial...

Since it is the holiday season, I thought a gift wrapping theme would be appropriate.  By no means am I insinuating that you don't know how to wrap a gift .. I just thought it would be fun to show you how I do it.

Step One:  Go ahead and gather all the materials you will need so you have them at arms reach.  The items I used are: Gift, wrapping paper, tape, scissors, ribbon, paper and markers.

paper and markers not pictured. oops.

Step Two:  Unroll your wrapping paper and, using your gift as a guide, cut out a generous piece of paper that easily wraps around all sides of the gift.

I like to pick the smallest sides as the "ends" which will be where you fold everything.

Step Three:  Fold one side up and place it in the middle of the top.  I like to place a tiny piece of tape here just to keep everything snug.


Step Four:  Bring the other side of the paper up to meet in the middle.  Fold the paper edge over so the seam looks clean and neat.


Step Five:  Find the two opposite sides that don't contain the main seam.  Push one side down and neatly crease all the edges.  Do the same for the other side.  *Note:  I went ahead and did one side so I could show pictures on the table top.  Placing the gift between your knees will allow you better handling when doing the first side.


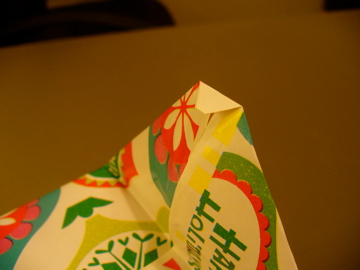
Step Six:  Take the flap that contains the seam and fold it up towards the middle.  Take the top flap, and after folding down the tip to make it neat, fold it over the lower flap.  Place a piece of tape on top to secure it in position.


Step Seven:  Depending on your choice of "finishing touches" the following steps will vary.  I did a simple ribbon in order to demonstrate a square knot.  *Note:  After starting I realized I didn't have enough spare ribbon.  Normally I would have done a bow but I just didn't have enough to allow for that.  Sorry.

The basics of a square knot are this:  whatever side you overlap first, overlap the other end next.  (i.e. left over right then right over left).  This allows the knot to pull on itself and it won't untie.  It will also never get too tight where you can't untie it.

left over right

a more complete "left over right"

right over left

Step Eight:  I like to use real ribbon.  It makes the whole gift presentation look a little nicer.  You can find nice ribbon on sale almost anywhere.  Just try not to use busy paper and busy ribbon.  If you use real ribbon then this would be the time to tie a bow.  You can use any bow you like.  If you use gift curling ribbon then this would be the time to take your scissors and curl it.  You get the point.  Since I ran out of ribbon then I won't worry about showing you a picture of the bare knot. :)

Step Nine: Identifying who the gift belongs to.  This is another outlet for you to be creative.  If you have kids then this would be a great project for them to do.  You can buy a ton of different tags in the store but if you want to make it look more personal then you can certainly make your own.  I spent only a couple minutes throwing this one together (and it looks like it ..haha) but you get the idea.  I simply cut out a shape similar to those on the package and colored it accordingly.  Use your imagination and have fun!


Merry Gift Wrapping!

Related Posts Plugin for WordPress, Blogger...