Not to toot my own horn or anything but I think I am a pretty good cook... at least my husband thinks so! My cooking repertoire varies. I try to span many cultural styles and mix in simple dishes with some that are more complex. That being said, there are a few avenues I have steered clear of. One of them? Bread.
There is something about having to mess with living yeast that just seems daunting to me. Well, no more! This past weekend I tackled my very first "real" bread (because biscuits and other quick-breads don't count ;)).
While perusing Food Network's website, I came across Anne Burrell's Focaccia Bread recipe and thought it sounded simple enough. It also didn't have too many ingredients so I figured if I royally screwed it up it wouldn't be a costly mistake. All I needed was my stand mixer, some saran wrap, and a jelly roll pan. It was SOOO easy and super delicious! The success/ease of this recipe makes me want to try other variations now. Sourdough, anyone?
Ingredients
1 3/4 cups warm water (about 110-120 degrees)
1 package active dry yeast
1 tablespoon sugar
5 cups all-purpose flour, plus additional for kneading
1 tablespoon kosher salt, plus coarse sea salt, for sprinkling
1 cup extra-virgin olive oil, divided
Directions
1. Combine the warm water, yeast and sugar in a small bowl. Put the bowl in a warm, not hot or cool, place until the yeast is bubbling and aromatic, at least 15 minutes.
2. In the bowl of a mixer fitted with a dough hook, combine the flour, 1 tablespoon of kosher salt, 1/2 cup olive oil and the yeast mixture on low speed. Once the dough has come together, continue to knead for 5 to 6 minutes on a medium speed until it becomes smooth and soft. Give it a sprinkle of flour if the dough is really sticky and tacky.
3. Transfer the dough to a clean, lightly floured surface, then knead it by hand 1 or 2 times. Again, give it another sprinkle of flour if the dough is really sticky and tacky.
4. Coat the inside of the mixer bowl lightly with olive oil and return the dough to the bowl. Cover it with plastic wrap and put it in a warm place until the dough has doubled in size, at least 1 hour.
5. Coat a jelly roll pan with the remaining 1/2 cup olive oil. (Chef's Note: This may seem excessive, but focaccia is an oily crusted bread. This is why it is soooooooooo delicious!).
6. Put the dough onto the jelly roll pan and begin pressing it out to fit the size of the pan. Turn the dough over to coat the other side with the olive oil. Continue to stretch the dough to fit the pan. As you are doing so, spread your fingers out and make finger holes all the way through the dough. (Chef's Note: Yes, this is strange. But when the dough rises again it will create the characteristic craggy looking focaccia. If you do not make the actual holes in the dough, the finished product will be very smooth.)
7. Put the dough in the warm place until it has doubled in size, about 1 hour. While the dough is rising a second time, preheat the oven to 425 degrees F.
8. Liberally sprinkle the top of the focaccia with some coarse sea salt and lightly drizzle a little oil on top. Bake the dough until the top of the loaf is golden brown, about 25 to 30 minutes. Remove the focaccia from the oven and let it cool before cutting and serving.
Showing posts with label Food Love. Show all posts
10.04.2012
7.03.2012
Pasta with Zucchini, Tomatoes and Creamy Lemon-Yogurt Sauce
I found this recipe on Pinterest and I made it for dinner last night. It is adapted from Jillian Michaels’ “The Master Your Metabolism Cookbook”. This was so suprisingly good that I had to share. The lemon-yogurt sauce gave me pause at first but it turned out to be the best part!! Although it is perfect without it, you could easily add grilled shrimp or chicken to this for a non-veggie version.
Ingredients:
8 ounces whole wheat linguine (or your pasta of choice)
1/2 cup nonfat plain Greek yogurt
1/4 cup grated Parmesan cheese
1 teaspoon grated lemon zest
1/4 teaspoon salt
1/4 teaspoon ground black pepper
1 tablespoon olive oil
3 medium zucchini, cut into thin strips (3 inches long and 3/4 inch wide, like a big stick of gum)
2 garlic cloves, thinly sliced
1/2 pint grape or cherry tomatoes, halved lengthwise
Directions:
1. Bring a large pot of water to a boil. Add the pasta, and cook about 9 minutes, or according to the package directions. Remove 1/4 cup of the cooking water, and set it aside. Drain the pasta. Set aside.
2. Meanwhile, in a large bowl, stir together the yogurt, Parmesan, lemon zest, and salt and pepper. Set aside.
3. In a large skillet, heat the olive oil over medium-high heat. Add the zucchini, and cook just until wilted, flipping them over occasionally with a spatula. (The zucchini will be soft and somewhat see-through.)
4. Use a spoon or spatula to push the zucchini aside so a space on the bottom of the pan is clear. Add the garlic, and cook for 15 to 30 seconds, until golden but not really brown.
5. Mix the garlic into the zucchini.
6. Stir in the tomatoes and cook until softened, about 2 minutes.
7. Transfer the zucchini mixture to the yogurt mixture, and stir to combine. Add the drained linguine, and toss gently to combine. Add the reserved pasta cooking water a tablespoon at a time, if necessary, to thin it. Divide among four bowls and serve.
Ingredients:
8 ounces whole wheat linguine (or your pasta of choice)
1/2 cup nonfat plain Greek yogurt
1/4 cup grated Parmesan cheese
1 teaspoon grated lemon zest
1/4 teaspoon salt
1/4 teaspoon ground black pepper
1 tablespoon olive oil
3 medium zucchini, cut into thin strips (3 inches long and 3/4 inch wide, like a big stick of gum)
2 garlic cloves, thinly sliced
1/2 pint grape or cherry tomatoes, halved lengthwise
Directions:
1. Bring a large pot of water to a boil. Add the pasta, and cook about 9 minutes, or according to the package directions. Remove 1/4 cup of the cooking water, and set it aside. Drain the pasta. Set aside.
2. Meanwhile, in a large bowl, stir together the yogurt, Parmesan, lemon zest, and salt and pepper. Set aside.
3. In a large skillet, heat the olive oil over medium-high heat. Add the zucchini, and cook just until wilted, flipping them over occasionally with a spatula. (The zucchini will be soft and somewhat see-through.)
4. Use a spoon or spatula to push the zucchini aside so a space on the bottom of the pan is clear. Add the garlic, and cook for 15 to 30 seconds, until golden but not really brown.
5. Mix the garlic into the zucchini.
6. Stir in the tomatoes and cook until softened, about 2 minutes.
7. Transfer the zucchini mixture to the yogurt mixture, and stir to combine. Add the drained linguine, and toss gently to combine. Add the reserved pasta cooking water a tablespoon at a time, if necessary, to thin it. Divide among four bowls and serve.
Labels:
Flexitarian,
Food Love
4.02.2012
Weeknight Apple Pie Bites
Sometimes you come across a recipe and it makes you go "duh!" This is one of those recipes. I came across it at Cookin' Up North via Pinterest.
I love apple pie but I hate cooking it. It's labor intensive and I never seem to want it that badly. Well this recipe takes all the work out of it! From start to finish it takes about 30 minutes. Seriously! It turns this American dessert into a treat you can have any time! Enjoy!
Ingredients
1 refrigerated pie crust
1 apple
1/4 cup sugar
1 tsp cinnamon
3 tbl butter, melted
Directions
1. Preheat oven to 425 degrees. Line a baking sheet with aluminum foil or parchment paper. Spray lining with non-stick spray.
2. Peel (optional) and core apple and cut into 8 wedges.
3. Unfold the pie crust. If your brand of pie crust is a circle, slice into 8 wedges. If your brand is a rectangle, cut into 8 strips.
4. Take one pie piece and brush it on one side with melted butter then sprinkle it with cinnamon and sugar. Place an apple wedge at the large end and roll up. Place on baking sheet. Repeat until you have eight.
5. Brush the tops of the pastry with more butter and sprinkle with cinnamon and sugar.
6. Bake for approximately 15-20 minutes or until golden brown.
Serve with ice cream and/or caramel sauce. Delish!
3.30.2012
Banana Blackberry Muffins
The other day, I had a few bananas lying around that had seen better days. I also had half a container of blackberries that needed to disappear fast. I mixed them into a basic muffin mix and here you go; a quick breakfast that's easy and delicious!
Ingredients
2 cups AP flour
1 cup sugar
2 tsp baking powder
1/2 tsp baking soda
1/4 tsp salt
3 overripe bananas, mashed
1 cup fresh blackberries (or any berry you prefer)
1/2 cup butter, softened
3 tablespoons milk
2 eggs
1 cup toasted walnuts (optional)
Directions
1. Preheat oven to 350. Grease cupcake pan or use liners.
2. In a large mixing bowl combine flour, sugar, baking powder, baking soda, and salt.
3. In a separate bowl, mash bananas and then add berries, butter, milk and eggs. Beat until blended.
4. Combine the wet batter into the dry batter. Stir to combine. Fold in nuts, if you choose.
5. Bake for approximately 30 minutes. Ovens vary so bake until a toothpick comes out clean.
Labels:
Breakfast/Brunch,
Food Love
3.12.2012
Birthday Cake
In honor of my wonderful husband's birthday today, I thought I would share our family's "Birthday Cake". This chocolate bundt cake is our favorite and it is what we make for our birthdays (or anytime we have an excuse, really). It's SUPER easy to make and really delicious. I hope you enjoy and, while we're at it, HAPPY BIRTHDAY MARK!!
Cake Ingredients:
~ 1 box chocolate cake mix (I usually choose Betty Crocker's Devil's Food or Dark Chocolate)
~ 1 box chocolate pudding mix (5.9oz)
~ 1 cup veggie oil
~ 1 cup sour cream
~ 1/2 cup hot tap water
~ 4 eggs, beaten
Directions:
~ Preheat oven to 350 degrees (or whatever the cake box says). Grease your bundt pan really well, including the top of the center divider! I use Crisco for this (it's about the only thing I use Crisco for ...) and I've never had a problem. Just put some on a paper towel and wipe the whole surface down.
~ In a large bowl, combine cake mix, pudding mix, oil, sour cream, water, and eggs. Mix until thoroughly combined.
~ Pour mixture into greased pan and bake for 50-55 minutes or until a toothpick comes out clean.
~ Remove pan from oven and let cool for at least 20 minutes. Invert cake onto dish. Drizzle glaze on top. (See recipe below)
Sugar Glaze Recipe
Glaze Ingredients:
~ 1 cup confectioners sugar
~ Approx. 2-3 tbsp milk
~ 1/2 tsp almond extract (you can switch this up to any flavor)
Directions:
~ In a small bowl, mix sugar, extract, and 1 tbsp of milk. Stir to combine.
~ Slowly add more milk until the glaze becomes the consistency you prefer. Mix well before adding more milk; a little goes a long way.
~ Drizzle over cake and serve!
Cake Ingredients:
~ 1 box chocolate cake mix (I usually choose Betty Crocker's Devil's Food or Dark Chocolate)
~ 1 box chocolate pudding mix (5.9oz)
~ 1 cup veggie oil
~ 1 cup sour cream
~ 1/2 cup hot tap water
~ 4 eggs, beaten
Directions:
~ Preheat oven to 350 degrees (or whatever the cake box says). Grease your bundt pan really well, including the top of the center divider! I use Crisco for this (it's about the only thing I use Crisco for ...) and I've never had a problem. Just put some on a paper towel and wipe the whole surface down.
~ In a large bowl, combine cake mix, pudding mix, oil, sour cream, water, and eggs. Mix until thoroughly combined.
~ Pour mixture into greased pan and bake for 50-55 minutes or until a toothpick comes out clean.
~ Remove pan from oven and let cool for at least 20 minutes. Invert cake onto dish. Drizzle glaze on top. (See recipe below)
Sugar Glaze Recipe
Glaze Ingredients:
~ 1 cup confectioners sugar
~ Approx. 2-3 tbsp milk
~ 1/2 tsp almond extract (you can switch this up to any flavor)
Directions:
~ In a small bowl, mix sugar, extract, and 1 tbsp of milk. Stir to combine.
~ Slowly add more milk until the glaze becomes the consistency you prefer. Mix well before adding more milk; a little goes a long way.
~ Drizzle over cake and serve!
3.07.2012
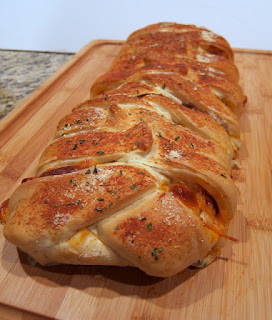
Braided Spaghetti Bread
This is another Pinterest find. If you are remotely watching your carbs then stay away from this. If you couldn't care less and love some carby goodness, sink your teeth into this spaghetti and garlic bread combo.
Ingredients:
1 package lough of french bread dough
6 oz spaghetti, cooked
1 cup thick spaghetti sauce
8 oz mozzarella cheese, shredded or cubed
1 egg white
Garlic powder
Parmesan cheese
Parsley flakes
** you can add cooked ground meat, too, if you want the "spaghetti and meatball" effect
Directions:
1. Spray counter lightly with non-stick cooking spray (or use parchment paper).
2. Roll loaf into a 12x16-inch rectangle.
3. Cook spaghetti according to package instructions. Drain and let cool slightly. Mix with sauce (and meat if you want).
4. Place spaghetti lengthwise in a 4-inch strip down the center of dough. Top with cheese.
5. Make cuts 1 ½-inches apart on long sides of dough to within ½-inch of filling.
6. Begin braid by folding top and bottom strips toward filling. Then braid strips left over right, right over left. Finish by pulling last strip over and tucking under braid.
7. Lift braid with both hands and place on large sprayed baking sheet. (or transfer parchment paper to baking sheet).
8. Brush with egg white and sprinkle with Parmesan cheese, parsley and garlic powder.
9. Bake at 350 for 30-35 minutes or until golden brown. Cool slightly and slice to serve.
Ingredients:
1 package lough of french bread dough
6 oz spaghetti, cooked
1 cup thick spaghetti sauce
8 oz mozzarella cheese, shredded or cubed
1 egg white
Garlic powder
Parmesan cheese
Parsley flakes
** you can add cooked ground meat, too, if you want the "spaghetti and meatball" effect
Directions:
1. Spray counter lightly with non-stick cooking spray (or use parchment paper).
2. Roll loaf into a 12x16-inch rectangle.
3. Cook spaghetti according to package instructions. Drain and let cool slightly. Mix with sauce (and meat if you want).
4. Place spaghetti lengthwise in a 4-inch strip down the center of dough. Top with cheese.
5. Make cuts 1 ½-inches apart on long sides of dough to within ½-inch of filling.
6. Begin braid by folding top and bottom strips toward filling. Then braid strips left over right, right over left. Finish by pulling last strip over and tucking under braid.
7. Lift braid with both hands and place on large sprayed baking sheet. (or transfer parchment paper to baking sheet).
8. Brush with egg white and sprinkle with Parmesan cheese, parsley and garlic powder.
9. Bake at 350 for 30-35 minutes or until golden brown. Cool slightly and slice to serve.
Labels:
Dinner,
Flexitarian,
Food Love
3.06.2012
Quinoa Patties
![]() |
| yum |
I think one of the biggest fails in vegetarian cooking is when people try to recreate meat dishes. It just never turns out right .. except for Morningstar Corn Dogs .. those things are amazing and even carnivore's can't tell the difference! But I digress..
I came across a recipe for Quinoa Burgers. I am renaming them patties and I did not serve them on a bun. They just aren't burgers but they are delicious nevertheless. Check them out below!
Ingredients:
I came across a recipe for Quinoa Burgers. I am renaming them patties and I did not serve them on a bun. They just aren't burgers but they are delicious nevertheless. Check them out below!
Ingredients:
2 rounded cups cooked quinoa
3/4 cup shredded cheddar cheese
1/2 cup low-fat cottage cheese
1 cup shredded zucchini, squeezed
3 eggs
3 tablespoons all purpose flour
2 green onions, including white parts
1 /2 teaspoon sugar
1/4 teaspoon black pepper
1/4 teaspoon ground cumin
1/8 teaspoon salt
1/8 teaspoon garlic powder
Olive oil for frying
Directions:
1. In a large bowl combine the cooked quinoa, cheddar cheese, cottage cheese, zucchini, eggs, flour, green onions, sugar, pepper, cumin, salt, and garlic powder.
2. Heat a frying pan and a couple teaspoons olive oil over medium-low heat. Mixture will be slightly sticky, so using a 1/4 cup measuring cup, drop mixture into pan and lightly flatten to 1/2 inch thick.1. In a large bowl combine the cooked quinoa, cheddar cheese, cottage cheese, zucchini, eggs, flour, green onions, sugar, pepper, cumin, salt, and garlic powder.
3. Fry until golden-brown, about 4 minutes on each side.
I served mine with a dollop of greek yogurt on top.
Labels:
Food Love
2.28.2012
Double Layer Cupcakes
![]() |
| yum |
While recently celebrating my birthday, I decided I wanted to bypass the whole "birthday cake" thing and do something more fun. I love cupcakes so I immediately went to my favorite
I came across a layered cupcake that looked so good. I decided to try it out and it was a success! So many possible variations so you will never get bored! The picture is a Neapolitan-inspired version with chocolate brownie, strawberry cake, and vanilla icing. I also tried chocolate brownie, funfetti cake, and rainbow chip icing. You really can't go wrong and the recipe couldn't be easier:
Ingredients:
1 box of brownie mix (any kind), prepared as directed
1 box cake mix (any kind), prepared as directed
1 container frosting
Directions:
1. Preheat oven according to package directions.
2. Prepare mixes in separate bowls.
3. In a greased (or lined) cupcake pan, fill each cup 1/3 the way up with brownie mix. Then go back and fill them up another 1/3 with the cake mix.
4. Bake 20-25 minutes, or according to the directions on the box.
5. Once cooled, ice them and enjoy!!
I love Reese's Cups so my next variation might be brownie, vanilla cake and peanut butter icing with crushed mini Reese's Cups on top. Anything goes! What variations do you want to try?
2.27.2012
Rice Whiskey Treats
I'm a scotch drinker. It's a very non-girly thing to enjoy but I love it. My husband, of course, shares similar taste buds. While at a friend's Super Bowl party, we were eating regular rice krispies treats and thought to ourselves "although delicious .. this needs something .." and then in dawned on us .. bourbon!!
After some googling I realized we were not the first to come to this realization so I do not lay claim to inventing this, however, the recipe below is my own. Feel free to tweak it as you see fit.
Ingredients:
5 ½ cups Rice Krispies
½ stick butter
10oz bag mini marshmallows
1 tsp vanilla extract
½ tsp cinnamon
¼ cup bourbon (I used Maker's Mark because that's our fav bourbon)
pinch of sea salt
Directions:
- Melt butter and marshmallows in a saucepan over medium heat.
- Mix in vanilla and cinnamon. Remove pan from heat and add the bourbon*.
- In a large bowl, pour the marshmallow mixture over the Rice Krispies and stir to combine.
- Press into greased 8x8 pan (for thick treats) or 9x13 (for thin treats). Let cool and set.
* The alcohol will smell A LOT stronger than it really is. Don't worry if it seems too boozy. I promise it doesn't taste that strong at all!
For regular treats:
- Reduce Rice Krispies by 1/2 cup and leave out bourbon and cinnamon.
For Orange Creamcicle treats:
- Double the vanilla, leave out the cinnamon and replace orange liqueur for the bourbon.
After some googling I realized we were not the first to come to this realization so I do not lay claim to inventing this, however, the recipe below is my own. Feel free to tweak it as you see fit.
Ingredients:
5 ½ cups Rice Krispies
½ stick butter
10oz bag mini marshmallows
1 tsp vanilla extract
½ tsp cinnamon
¼ cup bourbon (I used Maker's Mark because that's our fav bourbon)
pinch of sea salt
Directions:
- Melt butter and marshmallows in a saucepan over medium heat.
- Mix in vanilla and cinnamon. Remove pan from heat and add the bourbon*.
- In a large bowl, pour the marshmallow mixture over the Rice Krispies and stir to combine.
- Press into greased 8x8 pan (for thick treats) or 9x13 (for thin treats). Let cool and set.
* The alcohol will smell A LOT stronger than it really is. Don't worry if it seems too boozy. I promise it doesn't taste that strong at all!
For regular treats:
- Reduce Rice Krispies by 1/2 cup and leave out bourbon and cinnamon.
For Orange Creamcicle treats:
- Double the vanilla, leave out the cinnamon and replace orange liqueur for the bourbon.
1.19.2012
Creamy Cornbread
I made this for dinner with our bible study the other day. They loved it. This is my regular cornbread. Sometimes I jazz it up more with a couple additions but this is the basic recipe. It's not dry at all and super easy. Try it!
Ingredients:
2 boxes of Jiffy cornbread mix
1 can of creamed corn
8 oz of light sour cream
2 eggs
Directions:
1. Preheat oven to 375. Lightly grease a 9x13 dish.
2. Mix all the ingredients together.
3. Bake for 20-25 minutes until golden brown.
That's it!! SO simple! I use Jiffy mix and the boxes quotes the 375 temp and the 20-25 minute baking time. If you use a different brand, just follow the directions on the back of the box. Basically the adaption is in replacing the milk with creamed corn and sour cream. Yum ;)
Ingredients:
2 boxes of Jiffy cornbread mix
1 can of creamed corn
8 oz of light sour cream
2 eggs
Directions:
1. Preheat oven to 375. Lightly grease a 9x13 dish.
2. Mix all the ingredients together.
3. Bake for 20-25 minutes until golden brown.
That's it!! SO simple! I use Jiffy mix and the boxes quotes the 375 temp and the 20-25 minute baking time. If you use a different brand, just follow the directions on the back of the box. Basically the adaption is in replacing the milk with creamed corn and sour cream. Yum ;)
Labels:
Food Love,
Side Dishes
1.17.2012
Baked Mushroom Spinach Ravioli
My Fresh Pea and Chive Ravioli was the result of a newly discovered use of wonton wrappers. I had read of people using them for raviolis but I, myself, hadn't done it. Once I realized how easy it was, I knew I would be utilizing the trick more often .. and here you go.
This is another recipe using the same basic skills. I've switched out the ingredients and the cooking method but it's pretty much the same concept.
Ingredients:
1 pkg of wanton wrappers
2 tbsp veggie oil
1 (10 oz) package of frozen chopped spinach
6 oz of button mushrooms, sliced
1 container of mascarpone cheese
1/2 cup of parmesan cheese, shredded
2 tsp garlic powder, or to taste
1 tsp onion powder, or to taste
1/4 tsp grated nutmeg
1/2 tsp pepper
1 egg white, lightly beaten
*I used garlic powder and onion powder because, quite frankly, I was too lazy to use the real thing. I will probably use one clove of garlic and half an onion (diced) next time and add them to the saute. That's why I put "to taste".
Directions:
1. In a large saute pan, heat the oil until it starts to ripple. Add the mushrooms and cook until nicely browned.
2. In a microwave safe dish, place the frozen spinach in the microwave and cook for 3 minutes.
3. Once the mushrooms are deeply browned, add the spinach and cook until thoroughly heated. Remove from heat.
4. Add the mushroom mixture to a food processor and blend until roughly chopped.
5. In a mixing bowl, add the cheeses, chopped mushroom mixture and spices. Mix well.
6. On a dry and clean surface, lay out wanton wrappers. Place 1-2 tsp of filling in the center of each wrapper. Do not overfill.
7. Dip your finger in water and run it around the edge of the wanton wrapper. Take a second wrapper and place it on top. Press the edges together firmly to insure they seal. Make sure to do this one ravioli at a time. Do not wet all of them at once. You can use your fingers or a fork to tightly seal them. Place the finished ravioli to the side while you complete the others.
8. Preheat the oven to 375. Lightly spray a baking sheet.
9. Place the ravioli on the baking sheet. They can be rather close together but don't let them touch.
10. In a small bowl, lightly beat the egg white with a touch of water. Brush all sides of the raviolis.
11. Bake for 10-12 minutes or until they are golden brown.
You can serve this with a dipping sauce as an appetizer or drizzle with finishing oil as a side dish. They are delicious and super easy to make (albeit a tiny bit time-consuming). I prep these the day before and store (tightly wrapped) in the refrigerator until time to bake. They might even freeze well although I have not tried it. Enjoy!!
This is another recipe using the same basic skills. I've switched out the ingredients and the cooking method but it's pretty much the same concept.
Ingredients:
1 pkg of wanton wrappers
2 tbsp veggie oil
1 (10 oz) package of frozen chopped spinach
6 oz of button mushrooms, sliced
1 container of mascarpone cheese
1/2 cup of parmesan cheese, shredded
2 tsp garlic powder, or to taste
1 tsp onion powder, or to taste
1/4 tsp grated nutmeg
1/2 tsp pepper
1 egg white, lightly beaten
*I used garlic powder and onion powder because, quite frankly, I was too lazy to use the real thing. I will probably use one clove of garlic and half an onion (diced) next time and add them to the saute. That's why I put "to taste".
Directions:
1. In a large saute pan, heat the oil until it starts to ripple. Add the mushrooms and cook until nicely browned.
2. In a microwave safe dish, place the frozen spinach in the microwave and cook for 3 minutes.
3. Once the mushrooms are deeply browned, add the spinach and cook until thoroughly heated. Remove from heat.
4. Add the mushroom mixture to a food processor and blend until roughly chopped.
5. In a mixing bowl, add the cheeses, chopped mushroom mixture and spices. Mix well.
6. On a dry and clean surface, lay out wanton wrappers. Place 1-2 tsp of filling in the center of each wrapper. Do not overfill.
7. Dip your finger in water and run it around the edge of the wanton wrapper. Take a second wrapper and place it on top. Press the edges together firmly to insure they seal. Make sure to do this one ravioli at a time. Do not wet all of them at once. You can use your fingers or a fork to tightly seal them. Place the finished ravioli to the side while you complete the others.
8. Preheat the oven to 375. Lightly spray a baking sheet.
9. Place the ravioli on the baking sheet. They can be rather close together but don't let them touch.
10. In a small bowl, lightly beat the egg white with a touch of water. Brush all sides of the raviolis.
11. Bake for 10-12 minutes or until they are golden brown.
You can serve this with a dipping sauce as an appetizer or drizzle with finishing oil as a side dish. They are delicious and super easy to make (albeit a tiny bit time-consuming). I prep these the day before and store (tightly wrapped) in the refrigerator until time to bake. They might even freeze well although I have not tried it. Enjoy!!
Labels:
Dinner,
Food Love,
I Heart Veggies
1.07.2012
Fresh Pea and Chive Ravioli
Mark says he hates peas.
His grievances with the tiny vegetable abound although their propensity to roll around the plate and their "lack of taste" are the top two. Naturally that means I want to break him of the hate. Not shockingly, I love peas. In fact, I haven't really met a vegetable I don't like. This has been the case my whole life. My parents had to make me eat my meat/protein .. not my veggies.
So the need to change Mark's mind was the inspiration for this dish. I wanted to present it in a different way to him; in a no-need-to-chase-around-the-plate way. Fresh peas are the best but frozen peas work here to. This is also a great base recipe. All you need to do is learn the technique and then the sky is the limit. Here we go:
Ingredients:
1 package wonton wrappers (the size is your preference, mine were about 2.5")
1 cup ricotta
1 1/2 cup peas
2 tbsp chives, minced + 1 tsp for garnish
1 tsp salt
1 tsp pepper
1 tsp garlic powder
Directions:
1. In a large pot, bring water to a boil and add salt. Blanche the peas in the water for 2-3 minutes. (If they are fresh peas, this will slightly cook them. If they are frozen peas, this will defrost them.) Put 1/4 cup of peas aside for garnish.
2. In a small food processor, add ricotta, 2 tbsp chives, 1 1/4 cup peas and spices. Blend until well combined.
3. Place one wonton wrapper on a clean, dry surface. Place a small amount in the center of the wrapper. I used about 1 1/2 tbsp.)
4. Brush a small amount of water around all four edges of the wrapper. Place a second wrapper on top and seal. Make sure to press around the edge of the filling to remove as much excess air as possible. With a fork, crimp the edges to ensure they don't come apart.
5. Working in small batches and using the same water you blanched the peas in, cook the ravioli for about 3 minutes. Place them on a plate in single layers, with wax paper in between, while you cook the rest of them.
(Note: If you are preparing this for company or simply want to make ahead, stop at this point, cover with plastic wrap and place in the refrigerator until ready.)
The ravioli are technically ready to eat. If you want to stop here, just drizzle them with some olive oil and sprinkle the remaining peas and chives on top for garnish. If you want to go one step further to develop a little more flavor like I did, continue to the next step:
6. In a large non-stick pan, add a little olive oil to the pan over medium-high heat and sear both sides of the ravioli. This develops a light brown color and deepens the flavor. You could also brown them in the oven.
Now you're ready to eat! Just plate them and serve! Mark and I both LOVED this variation on the simple pea. I will most likely be making this for my next vegetarian-skeptic guests. They are delicious and easy to make. I will also absolutely make them in advance and keep them at the ready. Then you will have dinner on the table in less than 15 minutes which leaves you more time to mingle! Just serve with a side (preferably one that is not green! ;))
Needless to say, Mark no longer hates peas.
Labels:
Food Love,
I Heart Veggies
12.22.2011
Microwave .. Potato Chips?!
Yep. You read that right.
Microwave.
Potato.
Chips.
While perusing pinterest (don't get me started on that obsession) I came across this nifty little pin claiming I could make potato chips -- at home -- in the microwave. At first I had a "yeah right" reaction but once I went to the source it seemed legit. Then I thought "well now I have to try this out"...
I am here to tell you .. it actually works!!
If I have piqued your interest and now you want to try it out for yourself .. here's what you do:
Take a potato and slice it very thin. I used a regular baking potato but I will be trying a sweet potato next. You can slice it with a knife or a mandoline. I would personally use a mandoline if you have one just for ease sake and uniformity. The thinner the slice the quicker the process but, truly, you can do as thick as you want (at least while staying in the "chip" realm .. no hockey pucks).
Take the potato slices and toss them in olive oil and salt and pepper.
Get a microwave-safe plate and spray it with non-stick spray or rub it down with the same oil that's on the potato.
Lay the potatoes out in a thin layer on the plate.
Microwave on high for about 4 minutes. Flip the slices and cook for 4 more minutes.
You should be able to tell they are done because the edges will start to get slightly wavy (like a potato chip) and they will lose their transparancy. Lay them on a cooling rack and, after a minute or so, they should be crunchy. Voila!
Side note: The cooking time will vary depending upon how thick your cuts are. Just start with 4 and then adjust. You might have to flip a couple times but no big deal. Also, don't worry about "over cooking". The only thing that happens if they go too long is that they turn dark brown (like a burnt chip) and are extra crunchy. This may or may not have happened to my last batch and, honestly, I kind of preferred those.
This is one of those easy trial and error experiments and it was really cool. Have fun with it and happy microwaving!!
Microwave.
Potato.
Chips.
While perusing pinterest (don't get me started on that obsession) I came across this nifty little pin claiming I could make potato chips -- at home -- in the microwave. At first I had a "yeah right" reaction but once I went to the source it seemed legit. Then I thought "well now I have to try this out"...
I am here to tell you .. it actually works!!
If I have piqued your interest and now you want to try it out for yourself .. here's what you do:
Take a potato and slice it very thin. I used a regular baking potato but I will be trying a sweet potato next. You can slice it with a knife or a mandoline. I would personally use a mandoline if you have one just for ease sake and uniformity. The thinner the slice the quicker the process but, truly, you can do as thick as you want (at least while staying in the "chip" realm .. no hockey pucks).
Take the potato slices and toss them in olive oil and salt and pepper.
Get a microwave-safe plate and spray it with non-stick spray or rub it down with the same oil that's on the potato.
Lay the potatoes out in a thin layer on the plate.
Microwave on high for about 4 minutes. Flip the slices and cook for 4 more minutes.
You should be able to tell they are done because the edges will start to get slightly wavy (like a potato chip) and they will lose their transparancy. Lay them on a cooling rack and, after a minute or so, they should be crunchy. Voila!
Side note: The cooking time will vary depending upon how thick your cuts are. Just start with 4 and then adjust. You might have to flip a couple times but no big deal. Also, don't worry about "over cooking". The only thing that happens if they go too long is that they turn dark brown (like a burnt chip) and are extra crunchy. This may or may not have happened to my last batch and, honestly, I kind of preferred those.
This is one of those easy trial and error experiments and it was really cool. Have fun with it and happy microwaving!!
12.21.2011
Jessie's Chocolate-less Chip Cookies
So here's the deal: Mark is a cookie fanatic. Sometimes he gets a craving and, seeing as cookies are the simplest things to make, I don't mind whipping up a batch.
Well, a year or two ago, Mark was having one of those I-need-a-cookie-now moments and I decided to make him my chocolate chip cookies (see recipe adjustments at the bottom). I assumed I had all the ingredients and so I started mixing everything together. When I got to the "add chocolate chips" step I realized ... there were none. I decided to bake them anyways and this was the result. It turned out to be a pretty good cookie and now (on purpose) I make these instead. If you ever wondered what the cookie part of the chocolate chip cookie tasted like .. here ya go :)
Ingredients:
1/2 cup (1 stick) unsalted butter, melted
3/4 cup packed dark brown sugar
3/4 cup sugar
2 large eggs, lightly beaten
1 teaspoon almond extract
2 1/4 cups all-purpose flour
3/4 teaspoon baking soda
1 teaspoon salt
Directions:
1. Preheat oven to 375 degrees.
2. In a large bowl (or mixer) combine together melted butter, sugars, eggs and extract until well blended.
3. In a separate bowl, mix together flour, baking soda and salt.
4. Slowly add the flour mixture to the wet mixture. Try not to over mix.
5. Scoop the mixture onto baking sheets. I line mine with either aluminum foil or parchment paper.
6. Bake for about 12 minutes. Pull them out when they start to look light brown.
For traditional chocolate chip cookies, substitute the almond extract for vanilla extract and add as many chocolate chips as you dare :)
12.18.2011
Broccoli Cornbread
When I find a recipe I typically "make it" in my head and see if I want to make it in real life. I have a pretty good grasp on flavors so I can usually guess pretty accurately. When I found this set of ingredients I just couldn't quite put my finger on it. Well I am glad that I went ahead and made it anyway. This was awesome. Mark mentioned he wants it in the regular rotation. That compliment is as good as gold :)
Ingredients:
1/2 cup butter, melted
1 onion, chopped
1 tsp salt
1 bag frozen broccoli florets, thawed, drained and chopped
3/4 cup cottage cheese
4 eggs, lightly beaten
1 tsp garlic powder
1/2 tbsp parsley
1 package cornbread mix (I use Jiffy)
Directions:
1. Preheat oven to 400 degrees and lightly grease a 9x13 pan or muffin tin.
2. In a large bowl, mix butter, onions, salt, chopped broccoli and eggs together. Stir in muffin mix and seasonings until well combined. Pour mix into baking dish.
3. Bake for 25-30 minutes or until golden brown.
I served with a side salad. This would also work as a great side dish.
Ingredients:
1/2 cup butter, melted
1 onion, chopped
1 tsp salt
1 bag frozen broccoli florets, thawed, drained and chopped
3/4 cup cottage cheese
4 eggs, lightly beaten
1 tsp garlic powder
1/2 tbsp parsley
1 package cornbread mix (I use Jiffy)
Directions:
1. Preheat oven to 400 degrees and lightly grease a 9x13 pan or muffin tin.
2. In a large bowl, mix butter, onions, salt, chopped broccoli and eggs together. Stir in muffin mix and seasonings until well combined. Pour mix into baking dish.
3. Bake for 25-30 minutes or until golden brown.
I served with a side salad. This would also work as a great side dish.
Labels:
Food Love
12.16.2011
Chickpea Lentil Soup
This is a delicious warm soup that is great for a chilly night. This was my first experience with lentils and they were so good.
Ingredients:
2 tbsp oil
1 onion, chopped
7 cups broth of choice
1 cup lentils
1/2 cup small macaroni
2 carrots, shredded
16 oz can chickpeas, drained and rinsed
1/2 tbsp garlic powder
1/2 tsp thyme
Directions:
1. In a large soup pot, saute the onion in oil over medium heat until tender. Add broth and lentils. Reduce heat, cover, and simmer for 30 minutes.
2. Add remaining ingredients, cover, and simmer for 15-20 minutes until carrot, lentils and chickpeas are tender.
I serve mine with flatbread and salad. You can garnish with black olives and sour cream if you like. We ate ours plain and it was delicious.
Ingredients:
2 tbsp oil
1 onion, chopped
7 cups broth of choice
1 cup lentils
1/2 cup small macaroni
2 carrots, shredded
16 oz can chickpeas, drained and rinsed
1/2 tbsp garlic powder
1/2 tsp thyme
Directions:
1. In a large soup pot, saute the onion in oil over medium heat until tender. Add broth and lentils. Reduce heat, cover, and simmer for 30 minutes.
2. Add remaining ingredients, cover, and simmer for 15-20 minutes until carrot, lentils and chickpeas are tender.
I serve mine with flatbread and salad. You can garnish with black olives and sour cream if you like. We ate ours plain and it was delicious.
Labels:
Food Love
11.26.2011
Tortellini with White Beans
This is a great weeknight meal. It's quick and easily adaptable. Just use whatever you have in your cabinets. This is one of those recipes I consider a "base" and will add and subtract to it constantly .. never being the same twice.
Ingredients:
1 bag frozen cheese tortellini
1 can cannellini beans, drained
1 pkg frozen spinach, thawed
1 medium onion, diced
1 clove garlic, minced
1 1/2 cups mushrooms, sliced
salt and pepper, to taste
Directions:
1. In a large pot, cook the tortellini according to package directions. Drain in colandar and set aside.
2. In the same pot, saute the onion, garlic, mushrooms and spinach. Add the beans and tortellini to the pot. Mix well.
3. Sprinkle parmesan cheese on top.
Ingredients:
1 bag frozen cheese tortellini
1 can cannellini beans, drained
1 pkg frozen spinach, thawed
1 medium onion, diced
1 clove garlic, minced
1 1/2 cups mushrooms, sliced
salt and pepper, to taste
Directions:
1. In a large pot, cook the tortellini according to package directions. Drain in colandar and set aside.
2. In the same pot, saute the onion, garlic, mushrooms and spinach. Add the beans and tortellini to the pot. Mix well.
3. Sprinkle parmesan cheese on top.
Labels:
Flexitarian,
Food Love
11.17.2011
Thanksgiving Menu
It seems like the actual Thanksgiving meal gets more press as the holiday itself. It's the one day a year people allow themselves to gorge on homemade goodies they don't normally have. Whether you are a newbie without a clue or a veteran who wants to switch it up ... Below is my idea* of what I would love to serve when it's my turn to cook the bird!
(Click on the links below for recipes)
Deep-Fried Turkey
Sausage, Apple and Cranberry Stuffing
Broccoli Casserole
Sweet Potato Souffle
Mac & Cheese
Bacon-Wrapped Green Bean Bundles
Deviled Eggs
Cranberry Sauce
Rolls/Butter
Libby's Famous Pumpkin Pie
Chocolate Pecan Pie
*My idea is based on approximately 12 people. It is not vegetarian and is not tailored to any specific dietary needs. I went with what I thought was traditional and what would please the most people in my family.
What are you serving this year? What is your favorite Thanksgiving dish?
Labels:
Food Love,
Organized Chaos,
Seasonal,
Thanksgiving
Chocolate Pecan Pie
Chocolate Pecan Pie
Ingredients:
1 (9-inch) unbaked pie shell
2 cups pecan halves
3 large eggs, beaten
3 tablespoons butter, melted
1/2 cup dark corn syrup
1 cup sugar
2 tablespoons good-quality bourbon
3 ounces semisweet chocolate, chopped
Directions:
1. Preheat the oven to 375 degrees.
2. Cover bottom of pie crust with pecans.
1. Preheat the oven to 375 degrees.
2. Cover bottom of pie crust with pecans.
3. In a medium bowl, whisk together the eggs and melted butter. Add the corn syrup, sugar, bourbon and the chopped chocolate. Stir until all ingredients are combined. Pour mixture into the pie shell over the pecans and place on a heavy-duty cookie sheet.
4. Bake for 10 minutes. Lower the oven temperature to 350 degrees and continue to bake for an additional 25 minutes or until pie is set. Remove from oven and cool on a wire rack.
Labels:
Dessert,
Food Love,
Seasonal,
Thanksgiving
Libby's Famous Pumpkin Pie
![]() |
| source |
Libby's® Famous Pumpkin Pie
Ingredients:
1 (9 inch) unbaked deep dish pie crust
1/2 cup white sugar
1/4 cup brown sugar
1 teaspoon ground cinnamon
1/2 teaspoon salt
1/2 teaspoon ground ginger
1/4 teaspoon ground cloves
2 eggs
1 (15 ounce) can LIBBY'S® 100% Pure Pumpkin
1 (12 fluid ounce) can NESTLE® CARNATION® Evaporated Milk
Directions:
1. Preheat oven to 425 degrees.
2. Combine sugar, salt, cinnamon, ginger and cloves in small bowl.
3. Beat eggs lightly in large bowl. Stir in pumpkin and sugar-spice mixture. Gradually stir in evaporated milk. Pour into pie shell.
4. Bake for 15 minutes. Reduce temperature to 350 degrees; bake for 40 to 50 minutes or until knife inserted near center comes out clean.
5. Cool on wire rack for 2 hours. Serve immediately or refrigerate. (Do not freeze as this will cause the crust to separate from the filling.)
Labels:
Dessert,
Food Love,
Seasonal,
Thanksgiving
Subscribe to:
Posts (Atom)