I know I am about two months late on this .. but I figured I would cover this now before I switch everything over in a week ;)
Seasonal decorating .. what's your take on it?
There is a woman I work with that freaking loves it. It seems her cubicle gets a complete overhaul for every holiday and season. And when I say 'every' .. I do mean it; Valentine's Day, St. Patrick's Day, Breast Cancer Awareness Month .. the lady doesn't miss a single one!
Here's the thing though .. as much as I like using her cubicle as a humongous calendar .. it's not for me. Not only do I not have the spare cash to cover my house in pink for Valentine's Day .. I just don't have the conviction .. with two exceptions: Fall and Christmas. Maybe one day I will add a couple touches here and there for Spring and Summer but for now I put my effort into making my house as cozy as possible for the colder months.
Fall has always been my absolute favorite time of year, but aside from a front door wreath, I've never really shown it love. This year I decided to change that. With a little help from the craft store, grocery store and some creative recycling .. I've put a few extra Fall-y touches throughout my house. It's only minor but it makes a difference. I hope to build on it even more next year but until then .. here's what I've done:
Showing posts with label Seasonal. Show all posts
11.17.2012
12.19.2011
Christmas Cards Galore
I didn't grow up in a family that did annual newsletters or picture cards. It just wasn't our thing. I'm sure, at some point, my mom did this but not that I can remember. I always loved getting them though so I knew when I was out on my own I would make a point to start the tradition.
The first year, 2008, ended up being a rush job. I wasn't sure how to go about doing them and where the best places to get them. I can't remember where we ended up buying them from but I learned a hard lesson that year: photo quality matters! The pictures ended up blurry but the point was made. Lesson learned.
In 2009 we tried our hand at making them from scratch. No template, no anything. It actually turned out pretty well. We didn't learn any hard lessons except when you design them yourself and then get them printed .. envelopes aren't included. Oops :)
The 2010 season brought us back to pre-made template designs. No complaints from this girl. I still like those cards. We designed them online, submitted them and picked them up at the local store within 30 minutes. It was efficient and great.
This year, once again, we tried something new. We went with Shutterfly. The price ended up double what we paid in years past so that gave me some pause. (I'm sure there are more affordable options and I will be sure to check them out next year.) I love this year's card. The paper quality is fantastic and I love the printing on both sides. One side (the side pictured) is matte finish and the other side is glossy. Love. It.
Who knows what next year's card will look like (and where it will originate from, for that matter) but, in the mean time,
Merry Christmas and Happy New Year
from our family to yours!
![]() |
| 2011 |
.. from years past ..
(side note: these cards have been stuffed in folders so I apologize for the poor quality. They were scanned in .. wear and tear and all.)
![]() |
| 2010 |
![]() |
| 2009 |
![]() |
| 2008 |
Labels:
Christmas,
Organized Chaos,
Seasonal
12.09.2011
The Art of Wrapping a Gift
This officially marks the second new "series" of posts that I have started this month. The first new addition was my midweek confessions series; a weekly confessional where I divulge my imperfectness. This second series I will call my The Art Of series; a photo tutorial on things that can make your life easier and more organized. Sometimes it's simply in the minutiae.
Anyways .. back to the tutorial...
Since it is the holiday season, I thought a gift wrapping theme would be appropriate. By no means am I insinuating that you don't know how to wrap a gift .. I just thought it would be fun to show you how I do it.
Step One: Go ahead and gather all the materials you will need so you have them at arms reach. The items I used are: Gift, wrapping paper, tape, scissors, ribbon, paper and markers.
Step Two: Unroll your wrapping paper and, using your gift as a guide, cut out a generous piece of paper that easily wraps around all sides of the gift.
Step Three: Fold one side up and place it in the middle of the top. I like to place a tiny piece of tape here just to keep everything snug.
Step Four: Bring the other side of the paper up to meet in the middle. Fold the paper edge over so the seam looks clean and neat.
Step Five: Find the two opposite sides that don't contain the main seam. Push one side down and neatly crease all the edges. Do the same for the other side. *Note: I went ahead and did one side so I could show pictures on the table top. Placing the gift between your knees will allow you better handling when doing the first side.
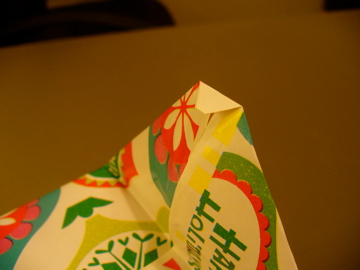
Step Six: Take the flap that contains the seam and fold it up towards the middle. Take the top flap, and after folding down the tip to make it neat, fold it over the lower flap. Place a piece of tape on top to secure it in position.
Step Seven: Depending on your choice of "finishing touches" the following steps will vary. I did a simple ribbon in order to demonstrate a square knot. *Note: After starting I realized I didn't have enough spare ribbon. Normally I would have done a bow but I just didn't have enough to allow for that. Sorry.
The basics of a square knot are this: whatever side you overlap first, overlap the other end next. (i.e. left over right then right over left). This allows the knot to pull on itself and it won't untie. It will also never get too tight where you can't untie it.
Step Eight: I like to use real ribbon. It makes the whole gift presentation look a little nicer. You can find nice ribbon on sale almost anywhere. Just try not to use busy paper and busy ribbon. If you use real ribbon then this would be the time to tie a bow. You can use any bow you like. If you use gift curling ribbon then this would be the time to take your scissors and curl it. You get the point. Since I ran out of ribbon then I won't worry about showing you a picture of the bare knot. :)
Step Nine: Identifying who the gift belongs to. This is another outlet for you to be creative. If you have kids then this would be a great project for them to do. You can buy a ton of different tags in the store but if you want to make it look more personal then you can certainly make your own. I spent only a couple minutes throwing this one together (and it looks like it ..haha) but you get the idea. I simply cut out a shape similar to those on the package and colored it accordingly. Use your imagination and have fun!
Anyways .. back to the tutorial...
Since it is the holiday season, I thought a gift wrapping theme would be appropriate. By no means am I insinuating that you don't know how to wrap a gift .. I just thought it would be fun to show you how I do it.
Step One: Go ahead and gather all the materials you will need so you have them at arms reach. The items I used are: Gift, wrapping paper, tape, scissors, ribbon, paper and markers.
![]() |
| paper and markers not pictured. oops. |
Step Two: Unroll your wrapping paper and, using your gift as a guide, cut out a generous piece of paper that easily wraps around all sides of the gift.
![]() | |
| I like to pick the smallest sides as the "ends" which will be where you fold everything. |
Step Three: Fold one side up and place it in the middle of the top. I like to place a tiny piece of tape here just to keep everything snug.
Step Four: Bring the other side of the paper up to meet in the middle. Fold the paper edge over so the seam looks clean and neat.
Step Five: Find the two opposite sides that don't contain the main seam. Push one side down and neatly crease all the edges. Do the same for the other side. *Note: I went ahead and did one side so I could show pictures on the table top. Placing the gift between your knees will allow you better handling when doing the first side.
Step Six: Take the flap that contains the seam and fold it up towards the middle. Take the top flap, and after folding down the tip to make it neat, fold it over the lower flap. Place a piece of tape on top to secure it in position.
Step Seven: Depending on your choice of "finishing touches" the following steps will vary. I did a simple ribbon in order to demonstrate a square knot. *Note: After starting I realized I didn't have enough spare ribbon. Normally I would have done a bow but I just didn't have enough to allow for that. Sorry.
The basics of a square knot are this: whatever side you overlap first, overlap the other end next. (i.e. left over right then right over left). This allows the knot to pull on itself and it won't untie. It will also never get too tight where you can't untie it.
![]() |
| left over right |
![]() |
| a more complete "left over right" |
![]() |
| right over left |
Step Eight: I like to use real ribbon. It makes the whole gift presentation look a little nicer. You can find nice ribbon on sale almost anywhere. Just try not to use busy paper and busy ribbon. If you use real ribbon then this would be the time to tie a bow. You can use any bow you like. If you use gift curling ribbon then this would be the time to take your scissors and curl it. You get the point. Since I ran out of ribbon then I won't worry about showing you a picture of the bare knot. :)
Step Nine: Identifying who the gift belongs to. This is another outlet for you to be creative. If you have kids then this would be a great project for them to do. You can buy a ton of different tags in the store but if you want to make it look more personal then you can certainly make your own. I spent only a couple minutes throwing this one together (and it looks like it ..haha) but you get the idea. I simply cut out a shape similar to those on the package and colored it accordingly. Use your imagination and have fun!
Merry Gift Wrapping!
Labels:
Christmas,
Organized Chaos,
Seasonal,
The Art Of,
Tips and Tricks
12.03.2011
Oh Christmas Tree...
Behold our Christmas Tree this year. :)
And yes .. it's in our kitchen. haha.
We rearranged our living room this past year and didn't realize we eliminated a space for our tree. We pulled everything out and then realized there was no where to put it! Well I decided we should just put it in the kitchen nook.
Confession: We don't use our kitchen table. During dinner we sit at our coffee table and talk about the day and listen to music. Go figure.
We took out our big table and replaced it with the tree. I have to say, I really like it. It's a nice glow and I am thinking this will be it's new place. Once we have kids and have to have a proper dinner time then I am sure all this will change again. Mark says we will have to get a smaller tree and stick it in the living room but I am not willing to accept that yet. Maybe we will just get a bigger living room ;) Until then .. here ya go ..
I'm sorry about the picture quality. These were taken at night and my camera is about 8 years old. Hopefully it will be replaced with a DSLR this Christmas ...
Do you think we are crazy for putting a tree in our kitchen? Where is your tree? Does your tree have a theme? Let me know what you think.
And yes .. it's in our kitchen. haha.
We rearranged our living room this past year and didn't realize we eliminated a space for our tree. We pulled everything out and then realized there was no where to put it! Well I decided we should just put it in the kitchen nook.
Confession: We don't use our kitchen table. During dinner we sit at our coffee table and talk about the day and listen to music. Go figure.
We took out our big table and replaced it with the tree. I have to say, I really like it. It's a nice glow and I am thinking this will be it's new place. Once we have kids and have to have a proper dinner time then I am sure all this will change again. Mark says we will have to get a smaller tree and stick it in the living room but I am not willing to accept that yet. Maybe we will just get a bigger living room ;) Until then .. here ya go ..
I'm sorry about the picture quality. These were taken at night and my camera is about 8 years old. Hopefully it will be replaced with a DSLR this Christmas ...
![]() |
| I couldn't manage a picture without the chandelier. |
| I went with a gold, silver and white theme. |
| I grew up with an angel on top of the tree and Mark grew up with a star. The star won. |
| The glitter snowflakes are my favorite. |
Do you think we are crazy for putting a tree in our kitchen? Where is your tree? Does your tree have a theme? Let me know what you think.
Labels:
Christmas,
Organized Chaos,
Seasonal
11.26.2011
Jingle Bells vs. Wedding Bells
Christmas always comes so quickly every year. After dinner on Thursday, my parents, Mark and I went over to my other aunt and uncle's house to see more family. We hadn't finished dinner an hour earlier and when we got in the car to ride over, Christmas music was on the radio the entire way. I mean, c'mon! I love Christmas as much as the next guy but it just doesn't seem like Thanksgiving gets a fair shake! Is it just me or is Thanksgiving the ugly stepsister to Christmas' Cinderella; the placeholder for the more favorable holiday.
As I sat around the kitchen table I watched my cousins look through the newspaper and analyze the coupons and Black Friday deals. I wish I had been the marketing exec that came up with that one. I just don't get why so many people are enthralled with it. The idea of going out at the wee hours of the morning to get assaulted over sale items just doesn't sound appealing to me. People claim it's fun but it just sounds like a bunch of drama. Christmas cheer anyone? To each his own, I suppose.
Today one of my cousins is getting married. His wedding is outside at a local plantation. The weather is gorgeous so I am looking forward to it. It's going to be amazing. I have heard a few details already and it's going to be one to remember. The wedding is at 5:00pm so that should give us plenty of time to celebrate and visit before we have to rush home, put on our jerseys, and prepare for the Gamecocks to beat the Tigers.
GO COCKS!!!
We are heading back home tomorrow. I love my family but I miss my home and my pup so it will be nice to get back. I hope everyone else has enjoyed their vacation and takes full advantage of these last couple days. December is always a crazy busy month so make sure you take time to rest. Have a great Saturday!!
11.21.2011
Thanksgiving Tips and Tricks
Thanksgiving Day is a time of fellowship and food. It can also be a source of stress due to the elaborate meal. I have compiled a quick list of tips and tricks for you.
- Accept help from others. Get your family to help pitch in, whether it's last minute cleaning or filling glasses with ice, you don't have to do the whole thing yourself!
- Plan your holiday table in advance. Make sure to lay out everything you need for dinner and ensure everything is ready and clean. You could even go ahead and set the table the night before!
- If someone offers, allow guests to bring a dish! There is no shame in getting help. You never know, you might discover a great new recipe and you will allow that person to share a bit of their own tradition with you.
- If applicable, plan for children. If you will have a lot of kids at your house make sure you plan for them. You don't want them in the kitchen and under foot with all the activity. Outdoor games, coloring books, movies, etc would be a great distraction.
- Cook early. If possible, prepare as many dishes as you can the day before. This will cut down on prep the day off. Label each dish using a stick note with the cooking time/temp.
- Most importantly .. enjoy yourself amongst your guests! Don't be a slave all day to the kitchen. Mingle and relax. It may not all be perfect but it will still be wonderful.
* If you are a crazy planner like me then there are a ton of "sample timelimes" on the web. They are a great tool for figuring out what your day might look like.
Is this old hat for you? What are some tricks and tips you have learned? What is some good advice for newbies?
Labels:
Organized Chaos,
Seasonal,
Thanksgiving,
Tips and Tricks
11.17.2011
Thanksgiving Menu
It seems like the actual Thanksgiving meal gets more press as the holiday itself. It's the one day a year people allow themselves to gorge on homemade goodies they don't normally have. Whether you are a newbie without a clue or a veteran who wants to switch it up ... Below is my idea* of what I would love to serve when it's my turn to cook the bird!
(Click on the links below for recipes)
Deep-Fried Turkey
Sausage, Apple and Cranberry Stuffing
Broccoli Casserole
Sweet Potato Souffle
Mac & Cheese
Bacon-Wrapped Green Bean Bundles
Deviled Eggs
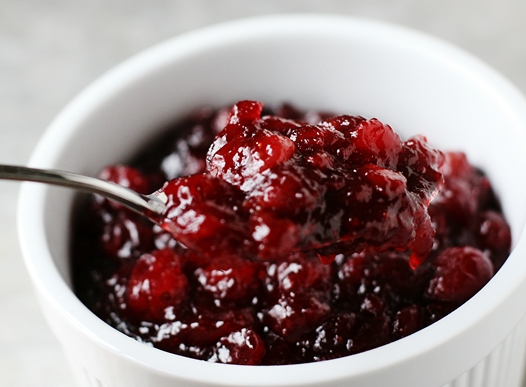
Cranberry Sauce
Rolls/Butter
Libby's Famous Pumpkin Pie
Chocolate Pecan Pie
*My idea is based on approximately 12 people. It is not vegetarian and is not tailored to any specific dietary needs. I went with what I thought was traditional and what would please the most people in my family.
What are you serving this year? What is your favorite Thanksgiving dish?
Labels:
Food Love,
Organized Chaos,
Seasonal,
Thanksgiving
Chocolate Pecan Pie
Chocolate Pecan Pie
Ingredients:
1 (9-inch) unbaked pie shell
2 cups pecan halves
3 large eggs, beaten
3 tablespoons butter, melted
1/2 cup dark corn syrup
1 cup sugar
2 tablespoons good-quality bourbon
3 ounces semisweet chocolate, chopped
Directions:
1. Preheat the oven to 375 degrees.
2. Cover bottom of pie crust with pecans.
1. Preheat the oven to 375 degrees.
2. Cover bottom of pie crust with pecans.
3. In a medium bowl, whisk together the eggs and melted butter. Add the corn syrup, sugar, bourbon and the chopped chocolate. Stir until all ingredients are combined. Pour mixture into the pie shell over the pecans and place on a heavy-duty cookie sheet.
4. Bake for 10 minutes. Lower the oven temperature to 350 degrees and continue to bake for an additional 25 minutes or until pie is set. Remove from oven and cool on a wire rack.
Labels:
Dessert,
Food Love,
Seasonal,
Thanksgiving
Libby's Famous Pumpkin Pie
![]() |
| source |
Libby's® Famous Pumpkin Pie
Ingredients:
1 (9 inch) unbaked deep dish pie crust
1/2 cup white sugar
1/4 cup brown sugar
1 teaspoon ground cinnamon
1/2 teaspoon salt
1/2 teaspoon ground ginger
1/4 teaspoon ground cloves
2 eggs
1 (15 ounce) can LIBBY'S® 100% Pure Pumpkin
1 (12 fluid ounce) can NESTLE® CARNATION® Evaporated Milk
Directions:
1. Preheat oven to 425 degrees.
2. Combine sugar, salt, cinnamon, ginger and cloves in small bowl.
3. Beat eggs lightly in large bowl. Stir in pumpkin and sugar-spice mixture. Gradually stir in evaporated milk. Pour into pie shell.
4. Bake for 15 minutes. Reduce temperature to 350 degrees; bake for 40 to 50 minutes or until knife inserted near center comes out clean.
5. Cool on wire rack for 2 hours. Serve immediately or refrigerate. (Do not freeze as this will cause the crust to separate from the filling.)
Labels:
Dessert,
Food Love,
Seasonal,
Thanksgiving
Cranberry Sauce
Cranberry Sauce
Ingredients:
12 ounces cranberries
1 cup white sugar
1 cup orange juice
1/4 tsp cinnamon
1/4 cup Grand Marnier
Directions:1. In a medium sized saucepan over medium heat, dissolve the sugar in the orange juice.
2. Stir in the cranberries and cook until the cranberries start to pop (about 10 minutes).
3. Add the cinnamon and Gran Marnier and mix well.
4. Remove from heat and place sauce in a bowl. Cranberry sauce will thicken as it cools.
Labels:
Food Love,
Seasonal,
Thanksgiving
Deviled Eggs
![]() |
| source |
Deviled Eggs
Ingredients:
12 eggs, boiled
1/4 onion, shredded
1/4 mayo
2 tbsp pickle relish
dash of hot sauce
salt and pepper to taste
paprika, for garnish
Directions:
1. In a large pot, place eggs gently in the bottom and fill with cold water until all the eggs are covered. Place pot on stove and bring to a boil. When it comes to a full boil, turn the heat off, cover with a tight lid and let sit for 12 minutes.
2. After eggs have rested, pour into a colander and rinse with cold water to cool off so you can touch them. Crack the eggs on the egg of the sink and peel. Set aside.
3. Slice each egg in half, long ways, and place cut side up on a dish. Place yolks in large bowl.
4. In a large bowl, mix egg yolks, onion, mayo, relish, hot sauce and salt and pepper until well blended.
5. Take a gallon-sized ziploc bag and place yolk mixture inside. Remove as much air as possible and seal. Snip off a small corner of the bag and pipe the yolk mixture into the egg halves.
6. Sprinkle with paprika and serve. Chill in the refrigerator if not serving immediately.
Labels:
Food Love,
Seasonal,
Thanksgiving
Bacon Wrapped Green Bean Bundles
![]() |
| source |
Bacon-Wrapped Green Bean Bundles
Ingredients:
1 lb. fresh green beans
5 strips of bacon
3 tbsp melted butter
1/4 cup brown sugar
1 clove garlic - pressed/finely chopped
1/8 tsp soy sauce
Directions:
1. In large pot, boil green beans until tender.
2. Meanwhile, fry the bacon in a skillet over med-low heat. You want the bacon to cook ‘soft’ so do not crisp the bacon. Place aside on paper towels to cool and reduce grease. Cut the strips into halves.
3. After beans have been drained, I like to put a little butter in the post to melt on the beans (this is optional and not included in the ingredients above). In a 13x9 pan lay one of the ‘half’ pieces of bacon and place several beans (about 6-7) then wrap the bacon around the bundle of beans and secure with a toothpick. continue doing this till the beans are gone.
4. Melt the 3 tsp of butter in small sauce pan. add brown sugar, garlic salt and soy sauce and mix continuously over med-high heat. Once completely blended, brush over the bundles until mixture is gone.
5. Bake at 400 degrees in the oven for 10-15 minutes.
Labels:
Food Love,
Seasonal,
Thanksgiving
Macaroni & Cheese
| source |
Mac & Cheese
Ingredients:
Butter, for greasing dish
12 ounces wide egg noodles
2 cups heavy cream
2 1/2 cups whole milk
2 teaspoons all-purpose flour
1/2 teaspoon salt, plus more for pasta water
1/4 teaspoon freshly ground black pepper
2 cups (packed) grated Fontina
3/4 cup (packed) finely grated Parmesan
3/4 cup (packed) grated mozzarella
2 tablespoons finely chopped flat-leaf parsley leaves
Directions:
1. Preheat the oven to 450 degrees. Butter a 13 by 9-inch glass baking dish and set aside.
2. Cook the noodles in a large pot of boiling salted water until tender but still firm to bite, stirring frequently, about 5 minutes. Drain well, but do not rinse.
3. Whisk the cream, milk, flour, 1/2 teaspoon salt, and pepper in large bowl to blend.
4. Stir in 1 cup Fontina, 1/2 cup Parmesan, 1/2 cup mozzarella and parsley. Add the noodles and toss to coat. Transfer the noodle mixture to the prepared baking dish.
5. Toss the remaining 1 cup Fontina, 1/4 cup Parmesan, and 1/4 cup mozzarella in a small bowl to blend. Sprinkle the cheese mixture over the noodle mixture.
6. Bake until the sauce bubbles and the cheese melts and begins to brown on top, about 20 minutes. Let stand for 10 minutes before serving.
Labels:
Food Love,
Seasonal,
Thanksgiving
Sweet Potato Souffle
![]() |
| source |
Ingredients:
3 - 15oz cans yams
1/2 cup white sugar
1/3 cup butter, softened
2 eggs, beaten
1 teaspoon vanilla extract
1 tsp cinnamon
1/2 tsp nutmeg
1/4 tsp ginger
1/2 cup milk
1 cup flaked coconut
1/3 cup all-purpose flour
1 cup packed brown sugar
1 cup chopped walnuts
1/3 cup melted butter
Directions:
1. Preheat oven to 350 degrees. Spray 2-quart baking dish with cooking spray.
2. In a large boil, combine the yams, sugar, butter, eggs, vanilla, spices and milk. Spoon into a baking dish.
3. In a separate bowl, combine the coconut, flour, brown sugar, chopped nuts and melted butter. Sprinkle over the top of the sweet potatoes.
4. Bake at 350 degrees for 30 to 35 minutes.
Labels:
Food Love,
Seasonal,
Thanksgiving
Broccoli Casserole
![]() |
| source |
Broccoli Casserole
Ingredients:
2 (10-ounce) packages frozen chopped broccoli, cooked and drained
1 cup mayonnaise
1 cup grated sharp cheddar
1 (10 3/4-ounce) can condensed cream of mushroom soup
2 eggs, lightly beaten
2 cups crushed crackers
2 tablespoons butter, melted
Directions:
1. Preheat oven to 350 degrees. Spray a 13 by 9-inch baking dish with cooking spray.
2. In a large mixing bowl, combine broccoli, mayonnaise, cheese, soup and eggs. Mix well with a metal spoon.
3. Place the mixture in the prepared baking dish. Top with the crushed crackers and pour the melted butter evenly over the crackers.
4. Bake for 35 minutes or until set and browned.
Labels:
Food Love,
Seasonal,
Thanksgiving
Sausage, Apple and Cranberry Stuffing
![]() |
| source |
Sausage, Apple and Cranberry Stuffing
Ingredients:
5 cups cubed sourdough/white bread
1 pound ground sage turkey sausage
1 cup chopped onion
3/4 cup chopped celery
2 1/2 teaspoons dried sage
1 1/2 teaspoons dried rosemary
1/2 teaspoon dried thyme
1 Golden Delicious apple, cored and chopped
3/4 cup dried cranberries
1/3 cup minced fresh parsley
1 egg
Ingredients:
5 cups cubed sourdough/white bread
1 pound ground sage turkey sausage
1 cup chopped onion
3/4 cup chopped celery
2 1/2 teaspoons dried sage
1 1/2 teaspoons dried rosemary
1/2 teaspoon dried thyme
1 Golden Delicious apple, cored and chopped
3/4 cup dried cranberries
1/3 cup minced fresh parsley
1 egg
1 cup turkey stock
4 tablespoons unsalted butter, melted
Directions:
1. Preheat oven to 350 degrees. Spread the bread cubes in a single layer on a large baking sheet. Bake for 5 to 7 minutes in the preheated oven, or until evenly toasted. Transfer toasted bread cubes to a large bowl.
2. In a large skillet, cook the sausage and onions over medium heat, stirring and breaking up the lumps until evenly browned. Add the celery, sage, rosemary, and thyme; cook, stirring, for 2 minutes to blend flavors.
3. Pour sausage mixture over bread in bowl. Mix in chopped apples, dried cranberries, parsley, and egg. 4. Drizzle with turkey stock and melted butter, and mix lightly. Spoon into baking dish.
4 tablespoons unsalted butter, melted
Directions:
1. Preheat oven to 350 degrees. Spread the bread cubes in a single layer on a large baking sheet. Bake for 5 to 7 minutes in the preheated oven, or until evenly toasted. Transfer toasted bread cubes to a large bowl.
2. In a large skillet, cook the sausage and onions over medium heat, stirring and breaking up the lumps until evenly browned. Add the celery, sage, rosemary, and thyme; cook, stirring, for 2 minutes to blend flavors.
3. Pour sausage mixture over bread in bowl. Mix in chopped apples, dried cranberries, parsley, and egg. 4. Drizzle with turkey stock and melted butter, and mix lightly. Spoon into baking dish.
5. Cover dish and bake for 30-45 minutes, stirring halfway during cooking.
Labels:
Food Love,
Seasonal,
Thanksgiving
Deep-Fried Turkey
Deep-Fried Turkey Marinade
Ingredients:
1 (16 ounce) bottle Italian dressing
1/2 cup cayenne pepper
1/2 cup black pepper
1 cup Creole seasoning
2 tablespoons garlic powder
Directions:
In a medium bowl, mix 3/4 Italian dressing, cayenne pepper, black pepper, Creole seasoning, and garlic powder. Rub over turkey, using remaining Italian dressing to fill cavity. Allow turkey to marinate 8 hours, or overnight, before deep-frying as desired.
NOTE: Rub over skin, under skin and in cavity. If you prefer, save a little of the marinade to inject into the bird at the last minute. The flavors mellow during cooking so it is not too spicy.
Deep-Fried Turkey
Ingredients:
3 gallons peanut oil for frying, or as needed
1 (12 pound) whole turkey, neck and giblets removed
1/4 cup Creole seasoning
Directions:1. Once you have set up your turkey fryer outside and BEFORE you had oil or turn on the heat, place the turkey (still in the marinating bag) into the pot and fill with water until is just covers the bird. Remove the bird and note the water level. This is the amount of oil you want to add to your pot. Add the oil and heat to 400 degrees.
2. Remove the turkey from the marinade and thoroughly pat dry with paper towels. Rub Creole seasoning over turkey inside and out. Make sure the hole at the neck is open at least 2 inches so the oil can flow freely through the bird.
3. Place the turkey in the drain basket. Slowly lower basket into hot oil to completely cover turkey. Maintain the temperature of the oil at 350 degrees, and cook turkey for 3 1/2 minutes per pound, about 45 minutes.
4. Carefully remove basket from oil, and drain turkey. Insert a meat thermometer into the thickest part of the thigh avoiding the bone; the internal temperature must be 180 degrees. Finish draining turkey on a paper lined platter.
SAFETY TIPS:
~ The turkey needs to be completely thawed and as dry as possible. This will prevent splatter and boil over.
~ Turn the propane off before putting the turkey in. This will prevent any problems in case a little oil does bubble over. After the bird is settled, relight the burner.
Labels:
Food Love,
Seasonal,
Thanksgiving
11.16.2011
Holiday Transitions
I love family holidays. I don't have one of those families that have a lot of drama so when we get together we have a genuinely good time. With that being said, I have grown pensive over the past week because I realized my current definition of a "family holiday" will soon change.
Growing up my family always kept the same pattern. Aside from my parents, almost my entire family lives in Charleston. For every big holiday we drove down to see them. Thanksgivings were spent with my dad's family. Christmas was split; the 23rd with my dad's side and the 25th with my mom's side. When Mark and I got married, I was all of a sudden faced with the prospect that I wouldn't be there every time. Mark had his own family and traditions that now had to merge with my own.
The first Thanksgiving Mark and I got lucky. My aunt/uncle/cousins on my dad's side came up to my parents house to spend the holiday. Since Mark's family lives ten minutes from my parents' house, that made it easy. We spent the afternoon with his family and the evening with mine. When Christmas came,we I still hadn't come to terms with splitting the holidays. That first Christmas involved a lot of driving. We drove to Charleston for the day on the 23rd. Spent Christmas Eve and Christmas morning with Mark's family and then drove back down to Charleston Christmas Day to be with my family. Driving home, completely exhausted on Christmas Night, we realized we couldn't keep it up. We had to share.
The next holiday season went more smoothly. We spent Thanksgiving with my family in Charleston and the entire Christmas with Mark's family. It was a lot of change but it turned out fun. We have spent several holidays rotating back and forth (the next Thanksgiving was spent with his family and Christmas with mine .. so on and so forth) and everything seemed settled. I spoke with my cousin on the phone earlier this week and it occurred to me that everything was going to get messed up again sooner than later.
Most of the changes are occurring on my side. Cousins are growing up and starting families of their own. I have one grandmother left. Our 20+ person Christmases are dwindling. Mark and I will be starting a family in the next couple years and that will complicate things further. The current arrangements will no longer work.
This year we are spending Thanksgiving with my family and Christmas with Mark's. This means we will be traveling to Charleston to see my Aunt and Uncle. Already the shift is happening. Two of my three cousins on that side will not be there. One lives in Indiana and will be spending the holiday with her husband's family. The other one works in DC and can't get off work.
Christmas isn't fairing much better. My aunt and uncle's house, the one everyone gathers at on Christmas Day, is up for sale. They have an offer and may be closing on December 15th. No one has decided what to do about Christmas Day yet. Both my sister and I will be with our respective in-laws so my parents will be the only reps from our family this year. My cousins on that side are scattering as well. I guess it was bound to happen sooner or later.
I know this is coming off as totally depressing and I certainly don't mean it that way. Changes are exciting. It means everyone is growing up and starting their own traditions. It just means we will have to do the same. The family units are shifting and we need to jump on board. I do get excited thinking about the possibilities though. Will we have Christmas at our house with both families? Will we have some sort of rotation? I don't know yet. I actually am not planning anything (shock, I know!) because there are too many variables left up in the air.
No matter what the future holds and what changes are made, the one thing I do know is that our holidays will always remain family-focused. It's always been that way and it's the one thing that will always remain constant.
![]() |
Growing up my family always kept the same pattern. Aside from my parents, almost my entire family lives in Charleston. For every big holiday we drove down to see them. Thanksgivings were spent with my dad's family. Christmas was split; the 23rd with my dad's side and the 25th with my mom's side. When Mark and I got married, I was all of a sudden faced with the prospect that I wouldn't be there every time. Mark had his own family and traditions that now had to merge with my own.
The first Thanksgiving Mark and I got lucky. My aunt/uncle/cousins on my dad's side came up to my parents house to spend the holiday. Since Mark's family lives ten minutes from my parents' house, that made it easy. We spent the afternoon with his family and the evening with mine. When Christmas came,
The next holiday season went more smoothly. We spent Thanksgiving with my family in Charleston and the entire Christmas with Mark's family. It was a lot of change but it turned out fun. We have spent several holidays rotating back and forth (the next Thanksgiving was spent with his family and Christmas with mine .. so on and so forth) and everything seemed settled. I spoke with my cousin on the phone earlier this week and it occurred to me that everything was going to get messed up again sooner than later.
Most of the changes are occurring on my side. Cousins are growing up and starting families of their own. I have one grandmother left. Our 20+ person Christmases are dwindling. Mark and I will be starting a family in the next couple years and that will complicate things further. The current arrangements will no longer work.
This year we are spending Thanksgiving with my family and Christmas with Mark's. This means we will be traveling to Charleston to see my Aunt and Uncle. Already the shift is happening. Two of my three cousins on that side will not be there. One lives in Indiana and will be spending the holiday with her husband's family. The other one works in DC and can't get off work.
Christmas isn't fairing much better. My aunt and uncle's house, the one everyone gathers at on Christmas Day, is up for sale. They have an offer and may be closing on December 15th. No one has decided what to do about Christmas Day yet. Both my sister and I will be with our respective in-laws so my parents will be the only reps from our family this year. My cousins on that side are scattering as well. I guess it was bound to happen sooner or later.
I know this is coming off as totally depressing and I certainly don't mean it that way. Changes are exciting. It means everyone is growing up and starting their own traditions. It just means we will have to do the same. The family units are shifting and we need to jump on board. I do get excited thinking about the possibilities though. Will we have Christmas at our house with both families? Will we have some sort of rotation? I don't know yet. I actually am not planning anything (shock, I know!) because there are too many variables left up in the air.
No matter what the future holds and what changes are made, the one thing I do know is that our holidays will always remain family-focused. It's always been that way and it's the one thing that will always remain constant.
Labels:
Ramblings,
Seasonal,
Thanksgiving
11.15.2011
Thanksgiving Decor
With Thanksgiving coming up I thought I would give everyone some inspiration for decorating. I figure that most people decorate for fall before Halloween but switch out a couple "holiday specific" items. No matter whether you are already done decorating or haven't even started, here are some pictures to get your imagination in gear ...
![]() |
| Cute Oreo turkeys that everyone woud love! |
![]() |
| Gourd Candle Centerpieces are a great alternative to large flower arrangements. This could also be a good option for a kids table since they are so low. |
![]() |
| I grew up with pine cone turkeys made with construction paper tails but pear name tags are much cuter! |
![]() |
| Try these hurricane tissue paper lanterns to cast a warm glow on your party. |
![]() |
| Whether you serve buffet-style or not .. wrap silverware with folded cloth napkins for easy retrieval. |
![]() |
| Cornhusked-wrapped votives provide gorgeous ambient light while allowing your guest to see each other across the table. |
![]() |
| This would look great on a mantle or sideboard! |
![]() |
| I do not have the source for this (google images) but this is my idea of a perfect setting! |
![]() |
| Love this! Have everyone write down something they are thankful for and share with the ones you love! |
![]() |
| Once again, no true source (google images) but if I had mantle I can guarantee you I would try to duplicate this! |
![]() |
| I love wreaths so I had to throw in a fun fall one! |
Labels:
Decorating,
Organized Chaos,
Seasonal,
Thanksgiving,
Tips and Tricks
Subscribe to:
Posts (Atom)