Showing posts with label Tips and Tricks. Show all posts

1.26.2012

The 10-Minute Quick Clean

Have you ever invited someone over to your house and it wasn't until you hung up the phone that you realized your house is a wreck!?  It happens to the best of us.  Here is my list of things that I do in this exact situation.  Got 10 minutes? Ready, Set, Go!

My focus is primarily on three places:  living room, kitchen and guest bathroom.  When friends/family drop by, these are the three rooms they would most likely frequent. 


Living Room:
  • Check to make sure couch cushions are straightened and pillows are placed where they should be.
  • Fold any blankets and put away. (I have a storage ottoman I throw them into.)
  • Gather magazines, books, etc and either place them in a neat stack or take them to another room.
  • Take all cups/dishes/shoes/jackets/etc to the rooms they belong in.  (If the rooms have doors, i.e. the bedroom, just throw the items on the bed and shut the door.)
Do you have a few extra minutes?  Run a dustcloth over sidetables and coffeetable.  You can also do a quick vacuum of the high-traffic areas.


Kitchen:
  • Are there dirty dishes on the counter/in the sink?  Quickly load the dishwasher.  If the dishwasher is full, and it would take too much time to unload/reload, then just rinse all the dishes off to remove the food residue and stack neatly in the sink. 
  • Wipe counters down to remove crumbs and smudges.
  • Clear the kitchen table or stack everything neatly.
Do you have a few extra minutes? A clean sink really makes a world of difference so do this task if you can.  You can also do a quick sweep/vacuum of the floor to remove crumbs and dirt.


Guest Bathroom:
  • Check toilet and maybe do a quick swipe with the brush if necessary.  Don't worry about cleaner.  You can sanitize later.
  • Wipe down counter surfaces and mirror.
  • Straighten towels and floor mats.
Do you have a few extra minutes?  Empty the trashcan and light a candle!


Don't be afraid to ask family members to help!  Even kids can get in on it.  They can certainly take shoes to closets or stack magazines.  Also note that most of the 'dirt' in your home only you can see.  You know what it looks like at its cleanest so that is what you are judging against.  No one is going to care at the end of the day if there was a spare sock you missed or a bowl in the sink.  You live in your house.  It's not a museum.  Relax and enjoy your company.

1.23.2012

Don't Carpe Diem

Below is an article written by Glennon Melton for the Huffington Post.  If you are a parent or ever want to be a parent .. read this.  Hell .. if you just have a lot on your plate in general .. read this. It's inspiring.


Happy Monday!

1.10.2012

HeyTell


 If you are facebook friends with me then you might have seen where I posted about HeyTell over the weekend.  I had several ask me what it was so I thought I would provide further clarification.  I was just introduced to this last week so I am definitely no expert but so far it has been really handy.

HeyTell is a free app available for Droids and iPhones.  It's basically an auditory text service.  You just speak into your phone like normal and it sends the audio file to your contact.  They can listen to the message and then record their own and send it back to you.  It's a delayed walkie talkie and it's awesome.

Some benefits I forsee:

1.)  It's a lot faster than texting .. unless you have some insane ability to text faster than you speak ;)

2.)  It's great for those of us that refuse to use bluetooth headsets (no offense if you do).  It's not exactly handsfree but there is a huge orange button (practically a third of the phone's screen) and you just have to touch somewhere within that button and talk.  You certainly can do it without taking your eyes of the road.  (OK OK before you freak out on me .. I do not condone texting while driving because it's dangerous.  However, some people are just stubborn and continue to do it so this would be a compromise.  This would still constitute using your phone while driving so if that's banned where you are .. just take that into consideration.)

3.)  Have you ever typed something sarcastic and it was completely taken out of context because they couldn't hear your tone of voice? Well here you go.


You obviously can only send messages to those that have the program so here is my official shout out.  If you choose to get it, send me a message so I can add you to my list.  It's fun :)

BTW - when you receive a message, you get a notification in your message bar like any other text message.  Personally, my phone also flashes a little yellow light (vs a green one with text and a blue one with facebook) so that's cool too.

The barcode is below so you can just scan it and download.  Happy texting!


1.04.2012

Cataloging Christmas Cards


I LOVE getting photo cards during the Christmas season.  I prop them around and they put a huge smile on my face.  What I don't love is having to deal with a ton of differently-sized loose photos after the season is over. 

I am not one for keeping cards.  I like them and all but I guess I am just not that sentimental.  For instance, if you send Mark or I birthday cards, they are displayed for the month of the birthday and then they are tossed.  Sorry.

Christmas cards are the exception.  More thought is behind them and it's great seeing families evolve over the years, especially the ones with kids.  It's a great way to share a little bit of your family with the ones you may not get to see all that often.

With that being said, my goal was to come up with a way that pleased by OCD side (i.e. I can't handle clutter and must throw everything away) while appeasing my ever-so-slight sentimental side (i.e. how fun would it be to look back and see how everyone has changed?) 

My solution?  I make a photo album.

If you like the idea, there are several ways you can go about doing it.  The old school (and just as nice) way is to buy a blank album, get colorful paper and creative scissors and glue the photos to the page.  Those albums are great but, personally, I don't have the attention span.  I also don't have all the materials so it would be a hassle for me to go out a purchase them.

What I do have is a computer and scanner.  I use Shutterfly and iPhoto but there are a ton of different programs out there.  Basically I take everyone's card, scan them into the computer and assemble a photo book online.  Each year, for about $15 and a little bit of my time, I can make a keepsake of everyone's card and have them neatly in one place.  I also like the photobook idea because they keep longer and they become seasonal coffeetable books.  They are a good time had by all.


Please note that, in my experience, I have had to use Photoshop in a few instances due to how certain cards scan.  This may vary on your scanner and cards but because the photos need to be very high quality, you need to double check each one before assembling your book to ensure they aren't grainy.


Do you keep your photo cards?  Do you have a way of storing them?  Do you make photo books for other occasions, like documenting vacations?

12.28.2011

25 Ways to Wear a Scarf in 4.5 Minutes

I'm obsessed with scarfs.  I wear them all the time (and maybe my green one more than most).  I typically alternate between 3 different ways of tying them.  I came across this video that showcases 25 different ways to wear a scarf in 4.5 minutes.  I think this is a GREAT tutorial if you, like me, are looking to switch it up a bit.  My favorite is probably the Magic Trick (at 2:36) but they are all great!  Check it out!!

12.23.2011

The Art of Hospital Corners

Ever heard the saying "it's the little things in life"? Well that is very true for me. Getting all greens on the way to work, making the perfect cup of coffee, 70-degree blue skies, etc. I get a lot of joy out of the details. One of the things I love is a freshly made bed. I always sleep so much better when the sheets are perfect.

Although that previous paragraph is entirely true and sounds extra Martha Stewart-ish .. please don't get me wrong. I never get all greens. I tend to drink slightly-less-than-perfect coffee. I'm always stuck in my cubicle on those 70-degree days. And my bed?

I'm going to be really honest with you:  I have always been taught you should wash your sheets once a week. Yeah, this doesn't happen. I'm lucky I get all of our laundry done and put away once a week .. and there is only two of us! I just DO NOT like laundry. I will wash it all day long but I hate putting it away. So seeing as clothes are far more important than sheets, I always save the sheets for last.  If I have the energy and that time .. they get washed.  If I don't .. they don't.  With that being said .. I average 1-2 times per month.  I'm sorry if that grosses some of you out.  We shower regularly and work desk jobs.  I just don't feel like it's all that bad.

Seeing as how I just admitted to you how non-Martha-ish I am, I'm going to let you in on one of my little secrets.  Sometimes if you just take the extra time to do something really well and thoroughly .. the results last a lot longer and you have to do it less often.  I will gladly spend an extra 3-5 minutes on the following task if it gives me an extra week or two of laziness.  The task I am referring to is making the bed.

The trigger for "omg I need to change these sheets NOW" is when they just start to get all rumpled and out of sorts.  I "make the bed" every day but straightening the sheets is far different from remaking it from scratch (which you obviously only do when you replace the linens.)  I've learned that if I do really well the first time then the non-rumpled feeling lasts longer.  So if you are even slightly like me and want to know how to keep a bed fresh-feeling longer.  Here's is a how-to guide on the art of hospital corners:


1. Spread the flat sheet out on the mattress that already has the fitted sheet on the bottom and center it. Place the top end of the sheet about 1 inch from the edge of the mattress at the head of the bed.

2. At the foot of the bed, lift the mattress and pull the top sheet snugly under the mattress. Do this at both sides of the bed so that the top sheet is firmly tucked under the mattress.

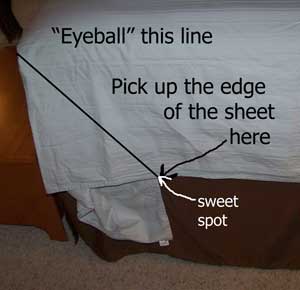
3. "Eyeball" a line from the corner of the mattress to the side edge of the sheet that is hanging down. This imaginary line should be at about a 45 degree angle.


4. . Using this imaginary line pick up the edge of the sheet at the "sweet spot". This will be the only spot where you pick up the sheet from now on.


5. Fold the sheet back over the mattress. It helps if you put your free hand on the edge of the mattress and fold the sheet over it.


6. Tuck in the sheet on the side of the bed that is hanging below the mattress. It should look like a little triangle and that is what gets tucked under the mattress.


7. Pick up the edge of the sheet again, right on the "sweet spot". Put your free hand on the side of the mattress this time. Bring the sheet down over your hand.


8. And there you go!  A perfectly made bed that will hopefully buy you some extra laziness.  Just throw your duvet or comforter on top and you're done.  Once you do this a time or two it honestly doesn't take long at all; an extra 3-5 minutes max.


Do you make your bed this way?  Do you wash your sheets weekly? More? Less?  Am I totally gross because I only change them once or twice a month? (Don't answer that last one ;) )

12.15.2011

Getting Cozi

Thanks to my friend Allie, I have been introduced to my new favorite organizational tool.  Cozi!

The Cozi Family Organizer is awesome.  You can sign up for it free online at www.cozi.com.  It's great for all kinds of uses.  I honestly haven't had it long enough to really play with it but so far it has done two things that have, for me, given it enough street cred to last a while.

(Side note: The other important factor with this program is the free downloadable app.  By having it online and in app form it is the best of both worlds.)
One of the features I am loving is the calendar.  You can upload and sync all of your calendars so that you have them in one easy to read location.  You can color-code each family member so you can see at-a-glance when someone has something.  There is one email address/password for each account so you can have all of your family members download the app, login using the family address/password, and then everyone can see the same information.

The other great feature is the grocery list.  I typically write down everything I need on my grocery trip on paper and then mark the items off as I place them in my basket.  With this app it's so much easier.  You can quickly type up your list online and it will be on your phone when you get there. You can, of course, add items via the app but typing them on the computer (given the access) is easier/faster for me.  As you go through the store gathering items you can check them off the list.  The "checked off" feature is great because it mimickes that of a paper list by turning the font light grey and striking through the item.  The program will also save your list if you want so if you tend to buy the same things over and over again then you won't have to keep writing them down.

There is so much more to the site but these were the top things that, so far, I have found most helpful.  There is an entire section dedicated to tricks and tips for getting organized and such so I am sure I will find some gems in there as well.  Anyways, the holiday season can be hectic so here is a tool that I hope you might find helpful.

Do you know of other programs like this one that you like?  Do you use apps like this or do you prefer to have a hardcopy daytimer?

12.13.2011

The Art of Tying a Perfect Bow

Knowing how to tie a perfect bow can come in handy sometimes. Whether you are wrapping a gift, making a craft, tying a dress or putting a ribbon in your child's hair .. there are many ways to show off your newly learned skill. Below are three bows that I learned to tie via Ms. Stewart:

The Favorite Bow
Perfectly suited for wire-edge or stiff ribbons that hold their shape. You'll need at least twelve inches of ribbon just for the bow. If wrapping a box, first tie a left-over-right half-knot.

Bow How-To:1. Shape two evenly sized loops, one in each side of the ribbon.
2. Cross right loop over left one.
3. Knot loops by threading right loop behind left one, under, and up through the hole; make sure ribbon is not twisted or bunched.
4. Pull loops into a smooth knot. Adjust loops; trim tails to be slightly longer than loops.


The Double Bow

To make a perfect double bow, leave enough tail on both ends of the first bow to make the second one. An extra set of hands is also helpful to ensure that loops are taut. First, follow directions for the favorite bow, leaving an even tail on both sides; don't finish ends.

Bow How-To:

1. Position bow horizontally, and determine which tail exits the knot on the top, and which exits underneath. Make a loop in each tail.
2. Cross top loop over bottom one.
3. Knot by threading top loop behind bottom one, under, and up through the hole; make sure ribbon is not twisted or bunched.
4. Pull loops to tighten; make sure knot of second bow overlaps knot of first. Trim tails, and arrange loops.


The Winged Bow
This classic treatment is simple and not frilly.  You'll need twelve to fourteen inches of ribbon to work with after encircling the object; use a right-over-left half-knot to secure the object.

Bow How-To:

1. Cross left tail over right one.
2. Knot ribbon by threading left tail behind right one, under, and up through the hole; make sure ribbon is not twisted or bunched.
3. Pull evenly on tails until ribbon has tightened into a clean, smooth knot.
4. Arrange folds, and trim ends of ribbon.


Happy Bow Making!

12.09.2011

The Art of Wrapping a Gift

This officially marks the second new "series" of posts that I have started this month.  The first new addition was my midweek confessions series; a weekly confessional where I divulge my imperfectness.  This second series I will call my The Art Of series; a photo tutorial on things that can make your life easier and more organized.  Sometimes it's simply in the minutiae.

Anyways .. back to the tutorial...

Since it is the holiday season, I thought a gift wrapping theme would be appropriate.  By no means am I insinuating that you don't know how to wrap a gift .. I just thought it would be fun to show you how I do it.

Step One:  Go ahead and gather all the materials you will need so you have them at arms reach.  The items I used are: Gift, wrapping paper, tape, scissors, ribbon, paper and markers.

paper and markers not pictured. oops.

Step Two:  Unroll your wrapping paper and, using your gift as a guide, cut out a generous piece of paper that easily wraps around all sides of the gift.

I like to pick the smallest sides as the "ends" which will be where you fold everything.

Step Three:  Fold one side up and place it in the middle of the top.  I like to place a tiny piece of tape here just to keep everything snug.


Step Four:  Bring the other side of the paper up to meet in the middle.  Fold the paper edge over so the seam looks clean and neat.


Step Five:  Find the two opposite sides that don't contain the main seam.  Push one side down and neatly crease all the edges.  Do the same for the other side.  *Note:  I went ahead and did one side so I could show pictures on the table top.  Placing the gift between your knees will allow you better handling when doing the first side.


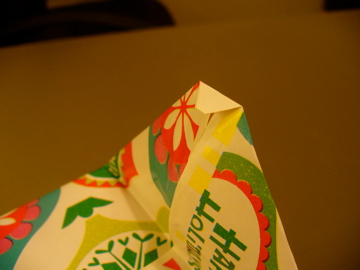
Step Six:  Take the flap that contains the seam and fold it up towards the middle.  Take the top flap, and after folding down the tip to make it neat, fold it over the lower flap.  Place a piece of tape on top to secure it in position.


Step Seven:  Depending on your choice of "finishing touches" the following steps will vary.  I did a simple ribbon in order to demonstrate a square knot.  *Note:  After starting I realized I didn't have enough spare ribbon.  Normally I would have done a bow but I just didn't have enough to allow for that.  Sorry.

The basics of a square knot are this:  whatever side you overlap first, overlap the other end next.  (i.e. left over right then right over left).  This allows the knot to pull on itself and it won't untie.  It will also never get too tight where you can't untie it.

left over right

a more complete "left over right"

right over left

Step Eight:  I like to use real ribbon.  It makes the whole gift presentation look a little nicer.  You can find nice ribbon on sale almost anywhere.  Just try not to use busy paper and busy ribbon.  If you use real ribbon then this would be the time to tie a bow.  You can use any bow you like.  If you use gift curling ribbon then this would be the time to take your scissors and curl it.  You get the point.  Since I ran out of ribbon then I won't worry about showing you a picture of the bare knot. :)

Step Nine: Identifying who the gift belongs to.  This is another outlet for you to be creative.  If you have kids then this would be a great project for them to do.  You can buy a ton of different tags in the store but if you want to make it look more personal then you can certainly make your own.  I spent only a couple minutes throwing this one together (and it looks like it ..haha) but you get the idea.  I simply cut out a shape similar to those on the package and colored it accordingly.  Use your imagination and have fun!


Merry Gift Wrapping!

12.03.2011

The Art of Folding a Fitted Sheet

Isn't it nice when you open the package of new sheets and everything is so neatly folded?  Isn't it awful after you wash them that they never seem to be that way again?  Well here is my little tutorial on how to fold a fitted sheet.

No, you don't have to wad it up in a ball of frustration anymore! Promise :)


Step One:  Take a corner of the sheet (ex: top right) and place it over one hand.


 Step Two:  Take the other corner (ex: top left) and place it over the first corner.


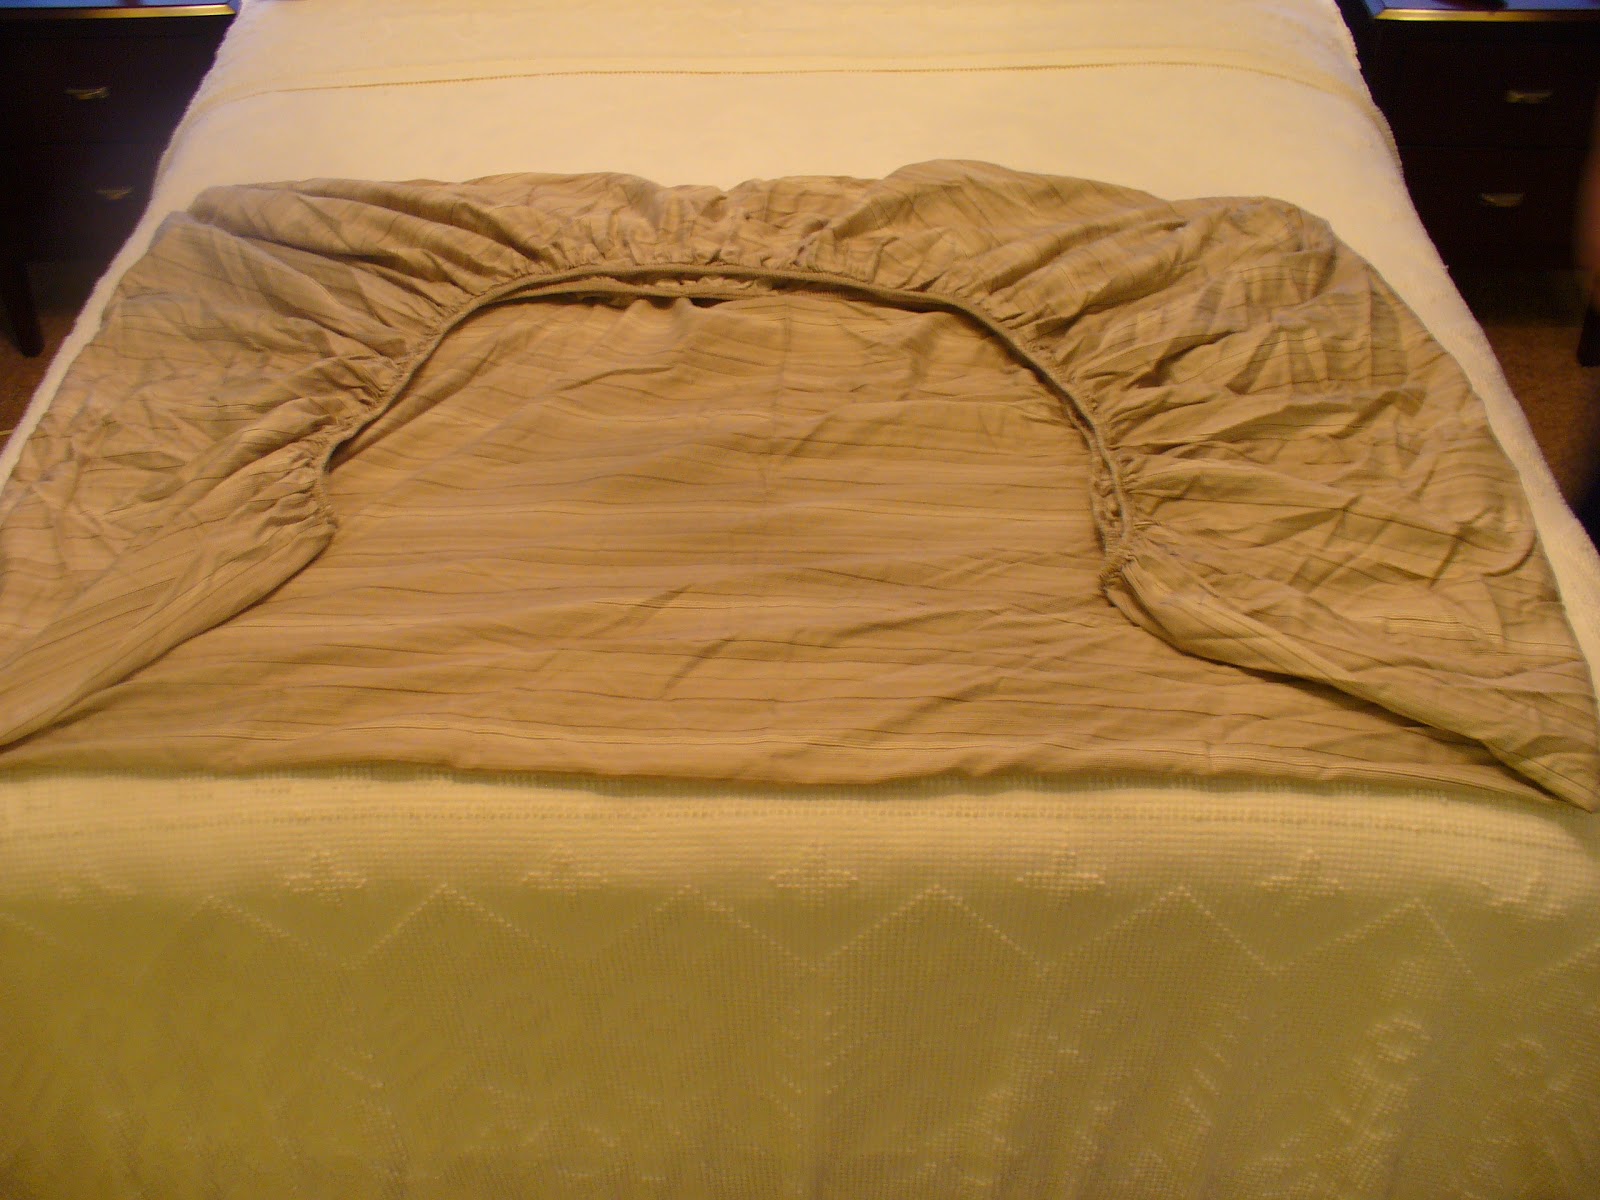
Step Three:  Repeat on the other side.  Eventually you can do the whole thing standing up but laying it out at first will help.  Once you have both corners inside the other, it should lay flat like this.  Just adjust the sheet until you have a rectangle.


Step Four:  Fold it in half.


Step Five:  Fold it in half again.


Step Six:  Fold it in thirds.


Voila!  You have neatly folded a fitted sheet!  If you want to take the organization a step further then you can do what I do.


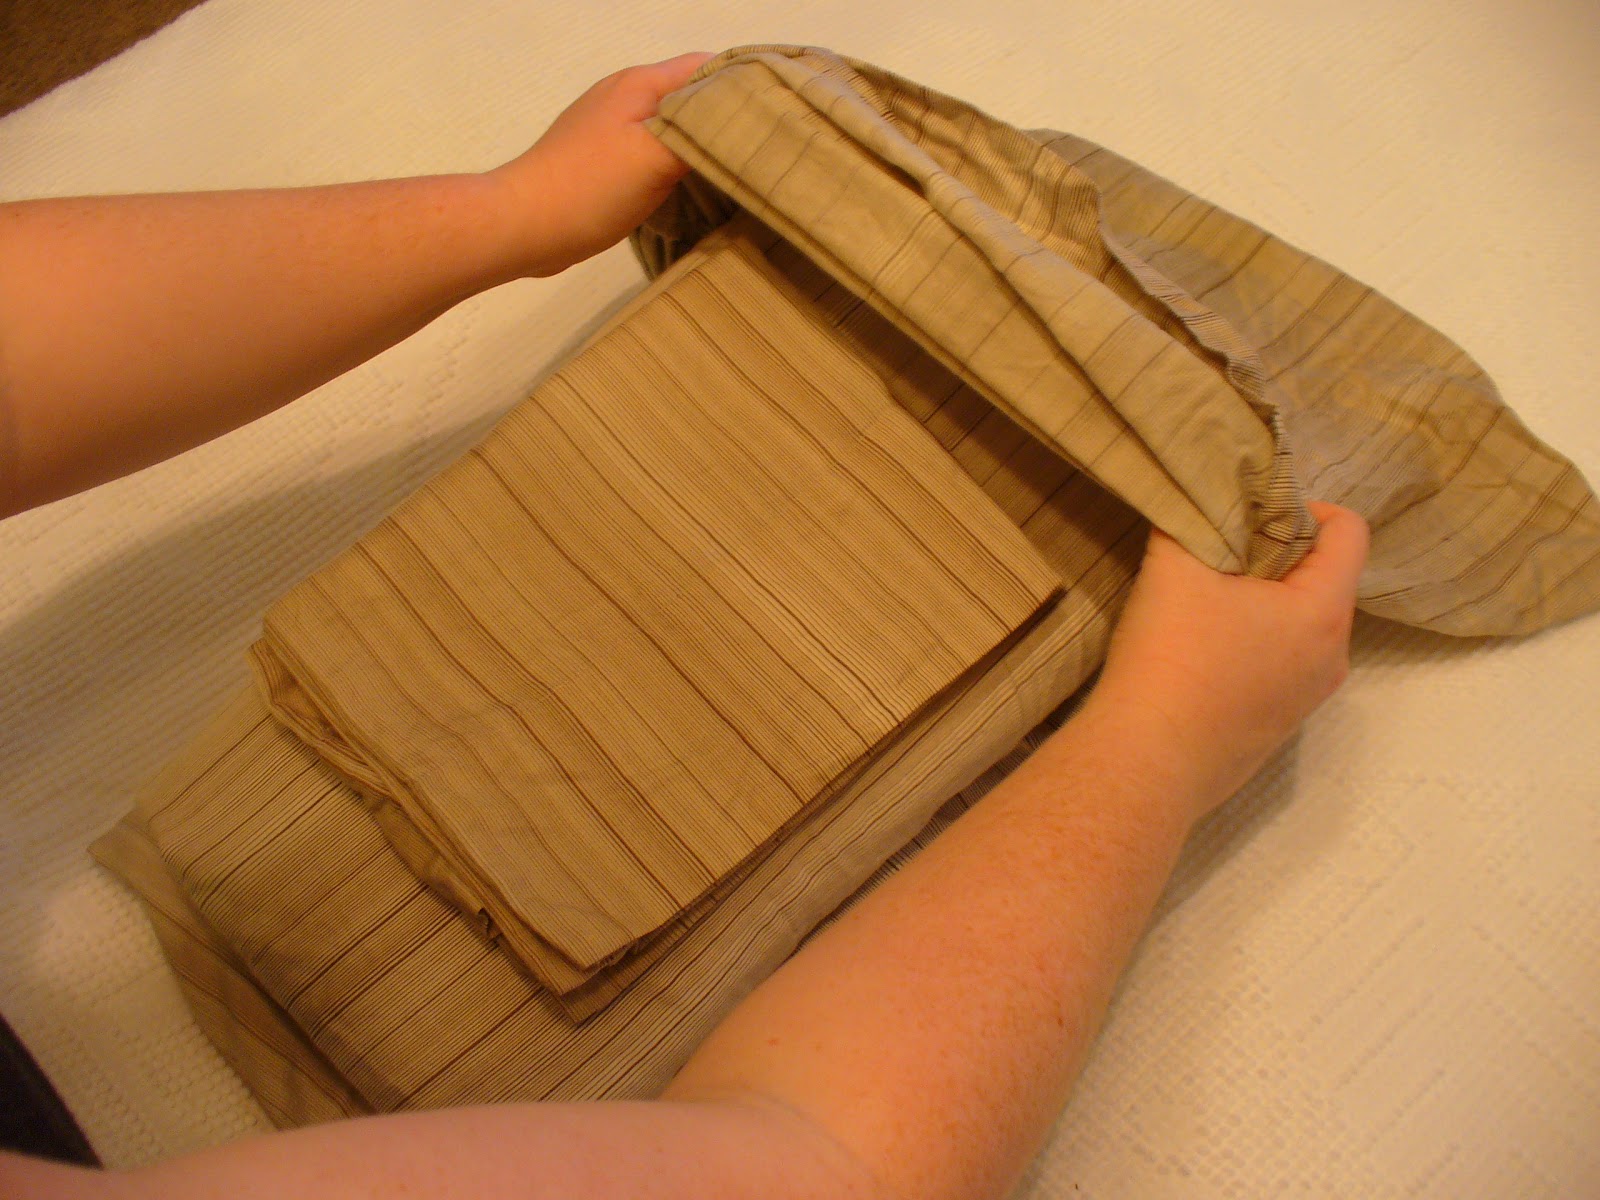
Step Seven:  Fold the flat sheet so it is about the same size and the fitted one.  Place all but one matching pillow case on top.


Step Eight:  Take the remaining pillow case and slip it over the stack of sheets.


There you go!  You have a "bed in a bag" ready when you are.  No more searching for all the matching sheets!

Now here is a sneak peek inside my bathroom closet.  

Top shelf (not pictured):  Extra toilet paper
Second shelf:  First aid kit, water for Netti Pot and a wicker basket that equals our medicine cabinet.
Third Shelf:  Bath towels on left and beach towels on right.
Fourth Shelf:  Sheets sets on left.  Miscellaneous pillow cases and an extra fitted sheet that don't "go" with anything else in the middle.  Hand towels and wash cloths on the right.
Below the shelves:  Our laundry basket.


Do you fold sheets this way?  Do you have suggestions for alternative ways to organize a linen closet?
Related Posts Plugin for WordPress, Blogger...